Make
This integration lets you connect Synthflow AI to your visual workflows in Make. Build scenarios that launch AI phone calls, respond to custom actions, and sync call results to the rest of your stack.
Overview
Make is a no-code platform for building multi-step workflows with conditional logic and real-time data flows. Connect Synthflow AI to CRMs, forms, data stores, and other apps to automate voice interactions without writing code.
Getting Started
Create or sign in to Make, then install the Synthflow AI Phone Calling app from the Make app directory. In the Make editor, open a new Scenario, add Synthflow AI as a module, and connect your account with an API key from Integrations → API Keys in your Synthflow dashboard. Once connected, add the triggers and actions below to orchestrate calls, and sync post-call data through your scenario.
Authentication
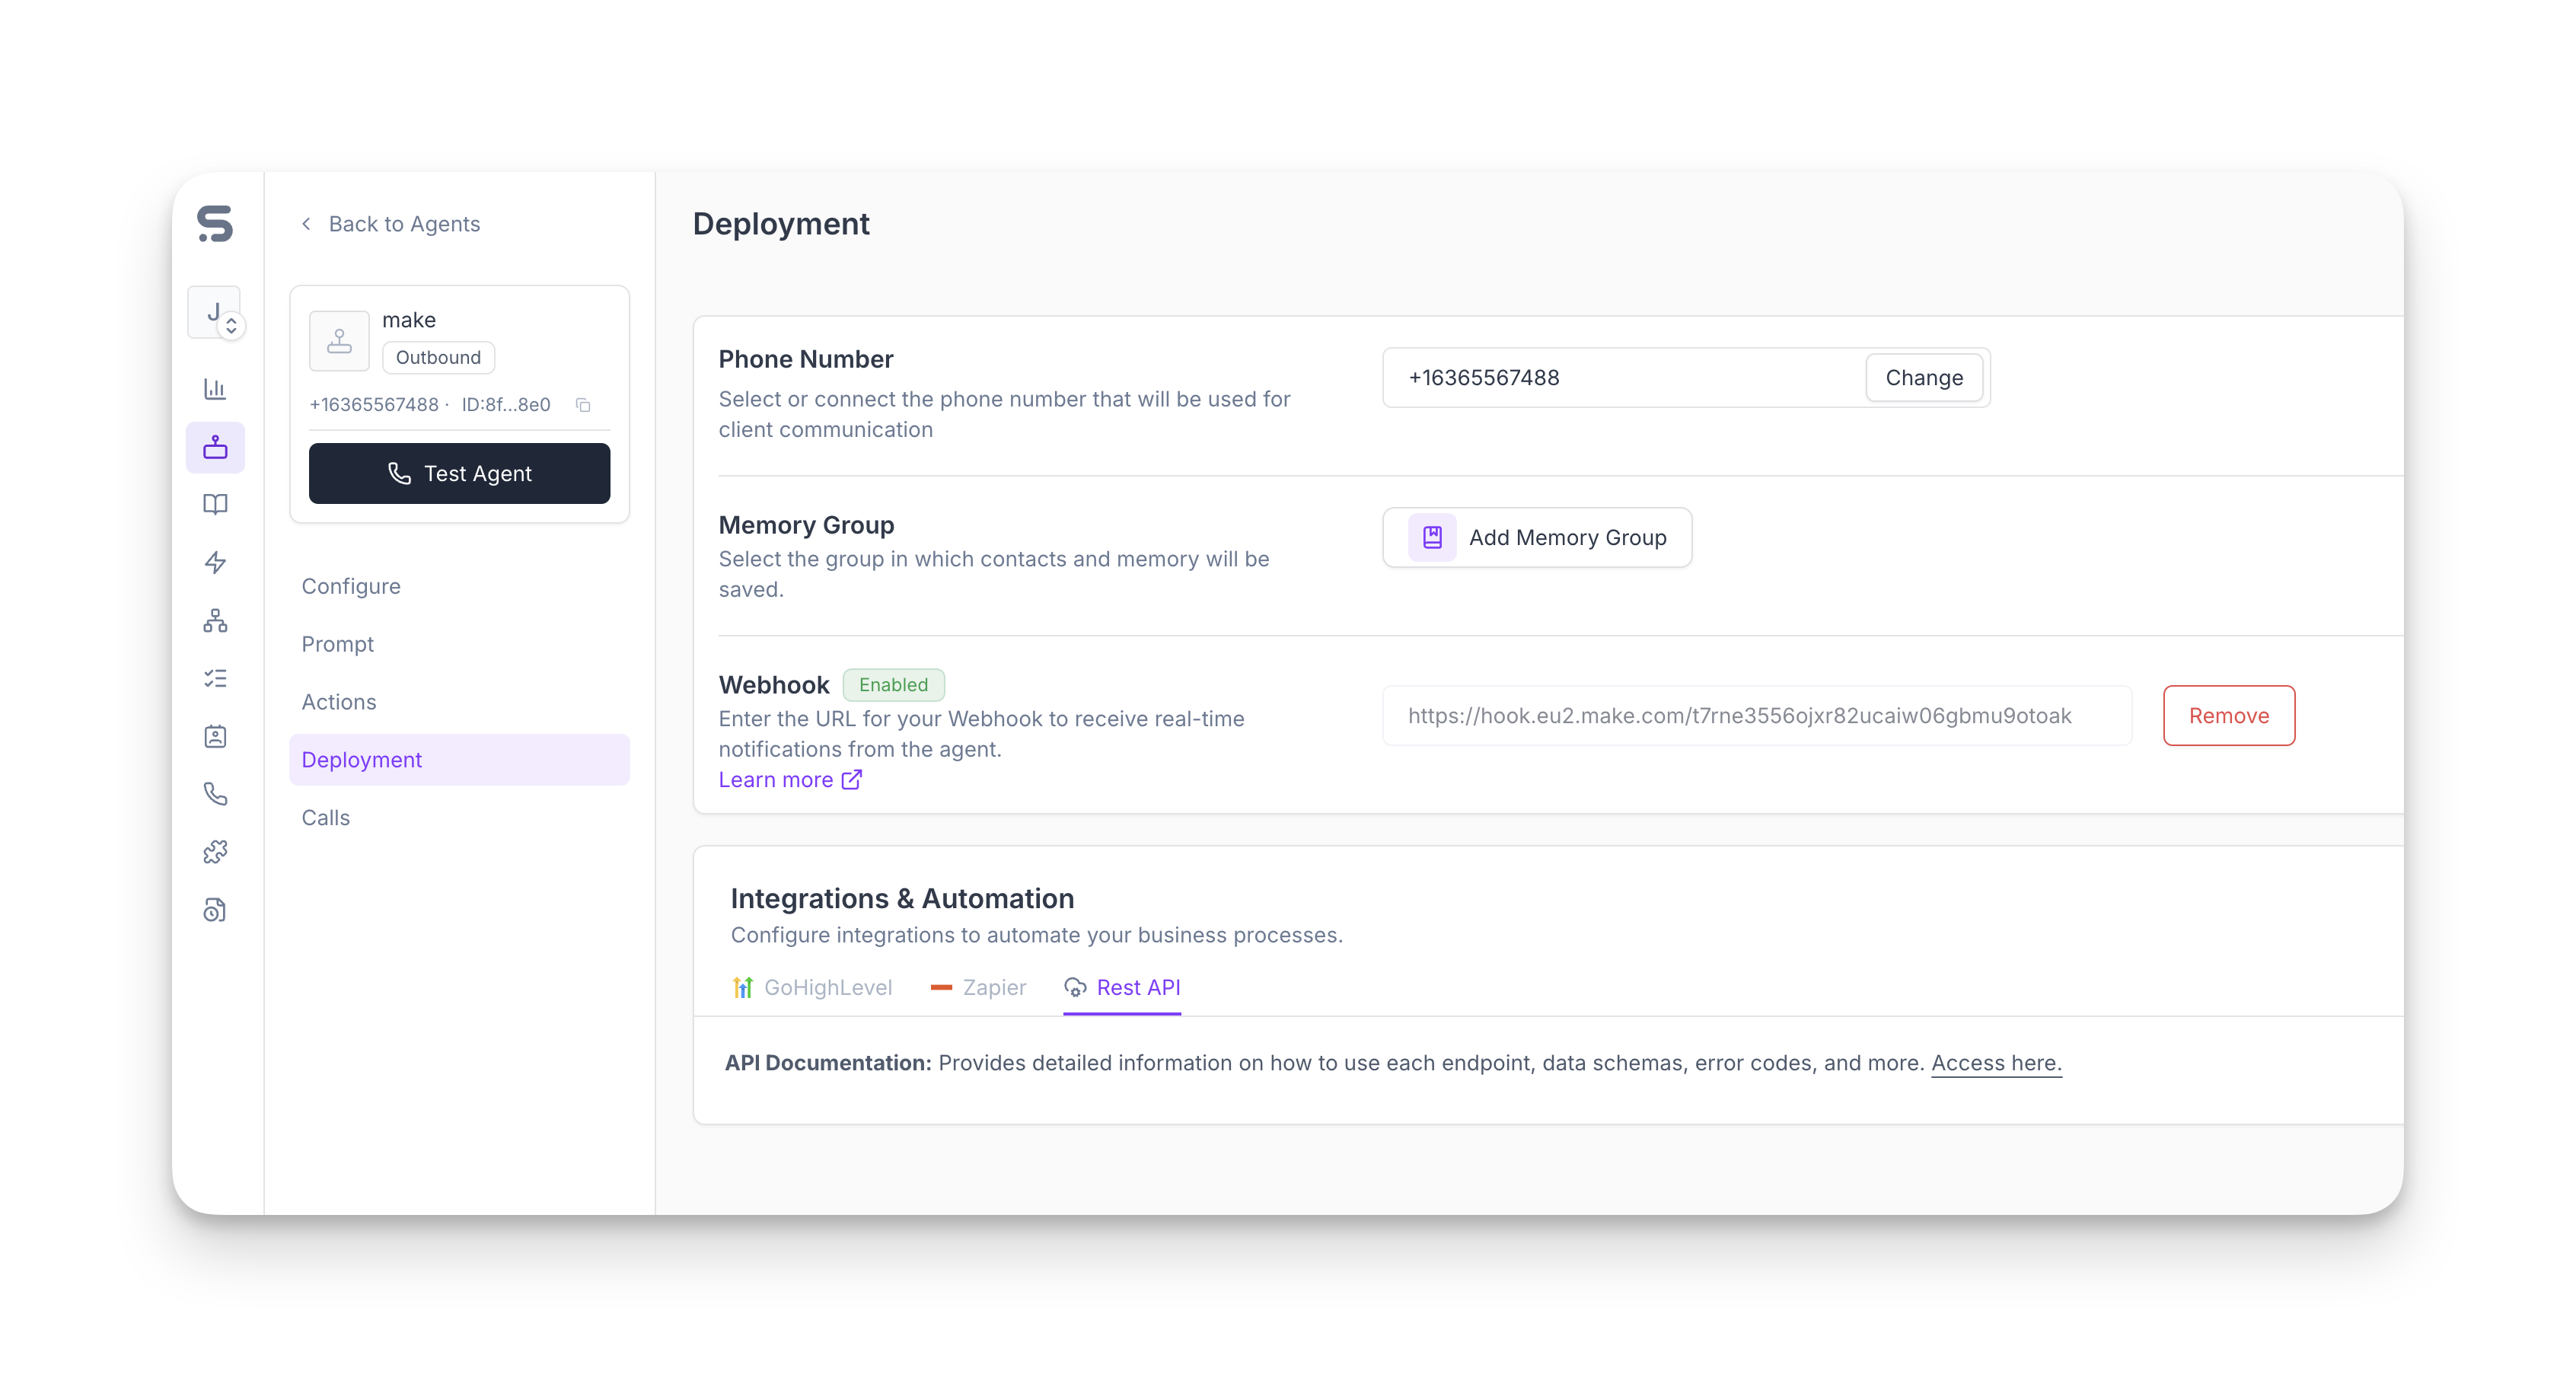
When adding a Synthflow module for the first time, Make prompts you for an API key. Create or copy a key from Integrations → API Keys in your Synthflow dashboard and paste it into the connection modal. To learn more, see Authentication.
Basics
Scenarios start with a trigger (often a webhook or Synthflow event), flow through actions, and pass mapped data like phone numbers, metadata, and call outputs between modules. Use filters or routers to branch when call outcomes or extracted values differ so each path can handle the right follow-up.
Triggers
If Synthflow should be the start of your scenario, the following events can be used as triggers for downstream actions in other applications:
- Watch Custom Action Request
- Watch Post Call Event
Actions
You can take the following actions in Synthflow AI in response to a trigger you configure in Make:
- Make an AI Phone Call
- Make an API Call
Configure each trigger and action
Watch Custom Action Request
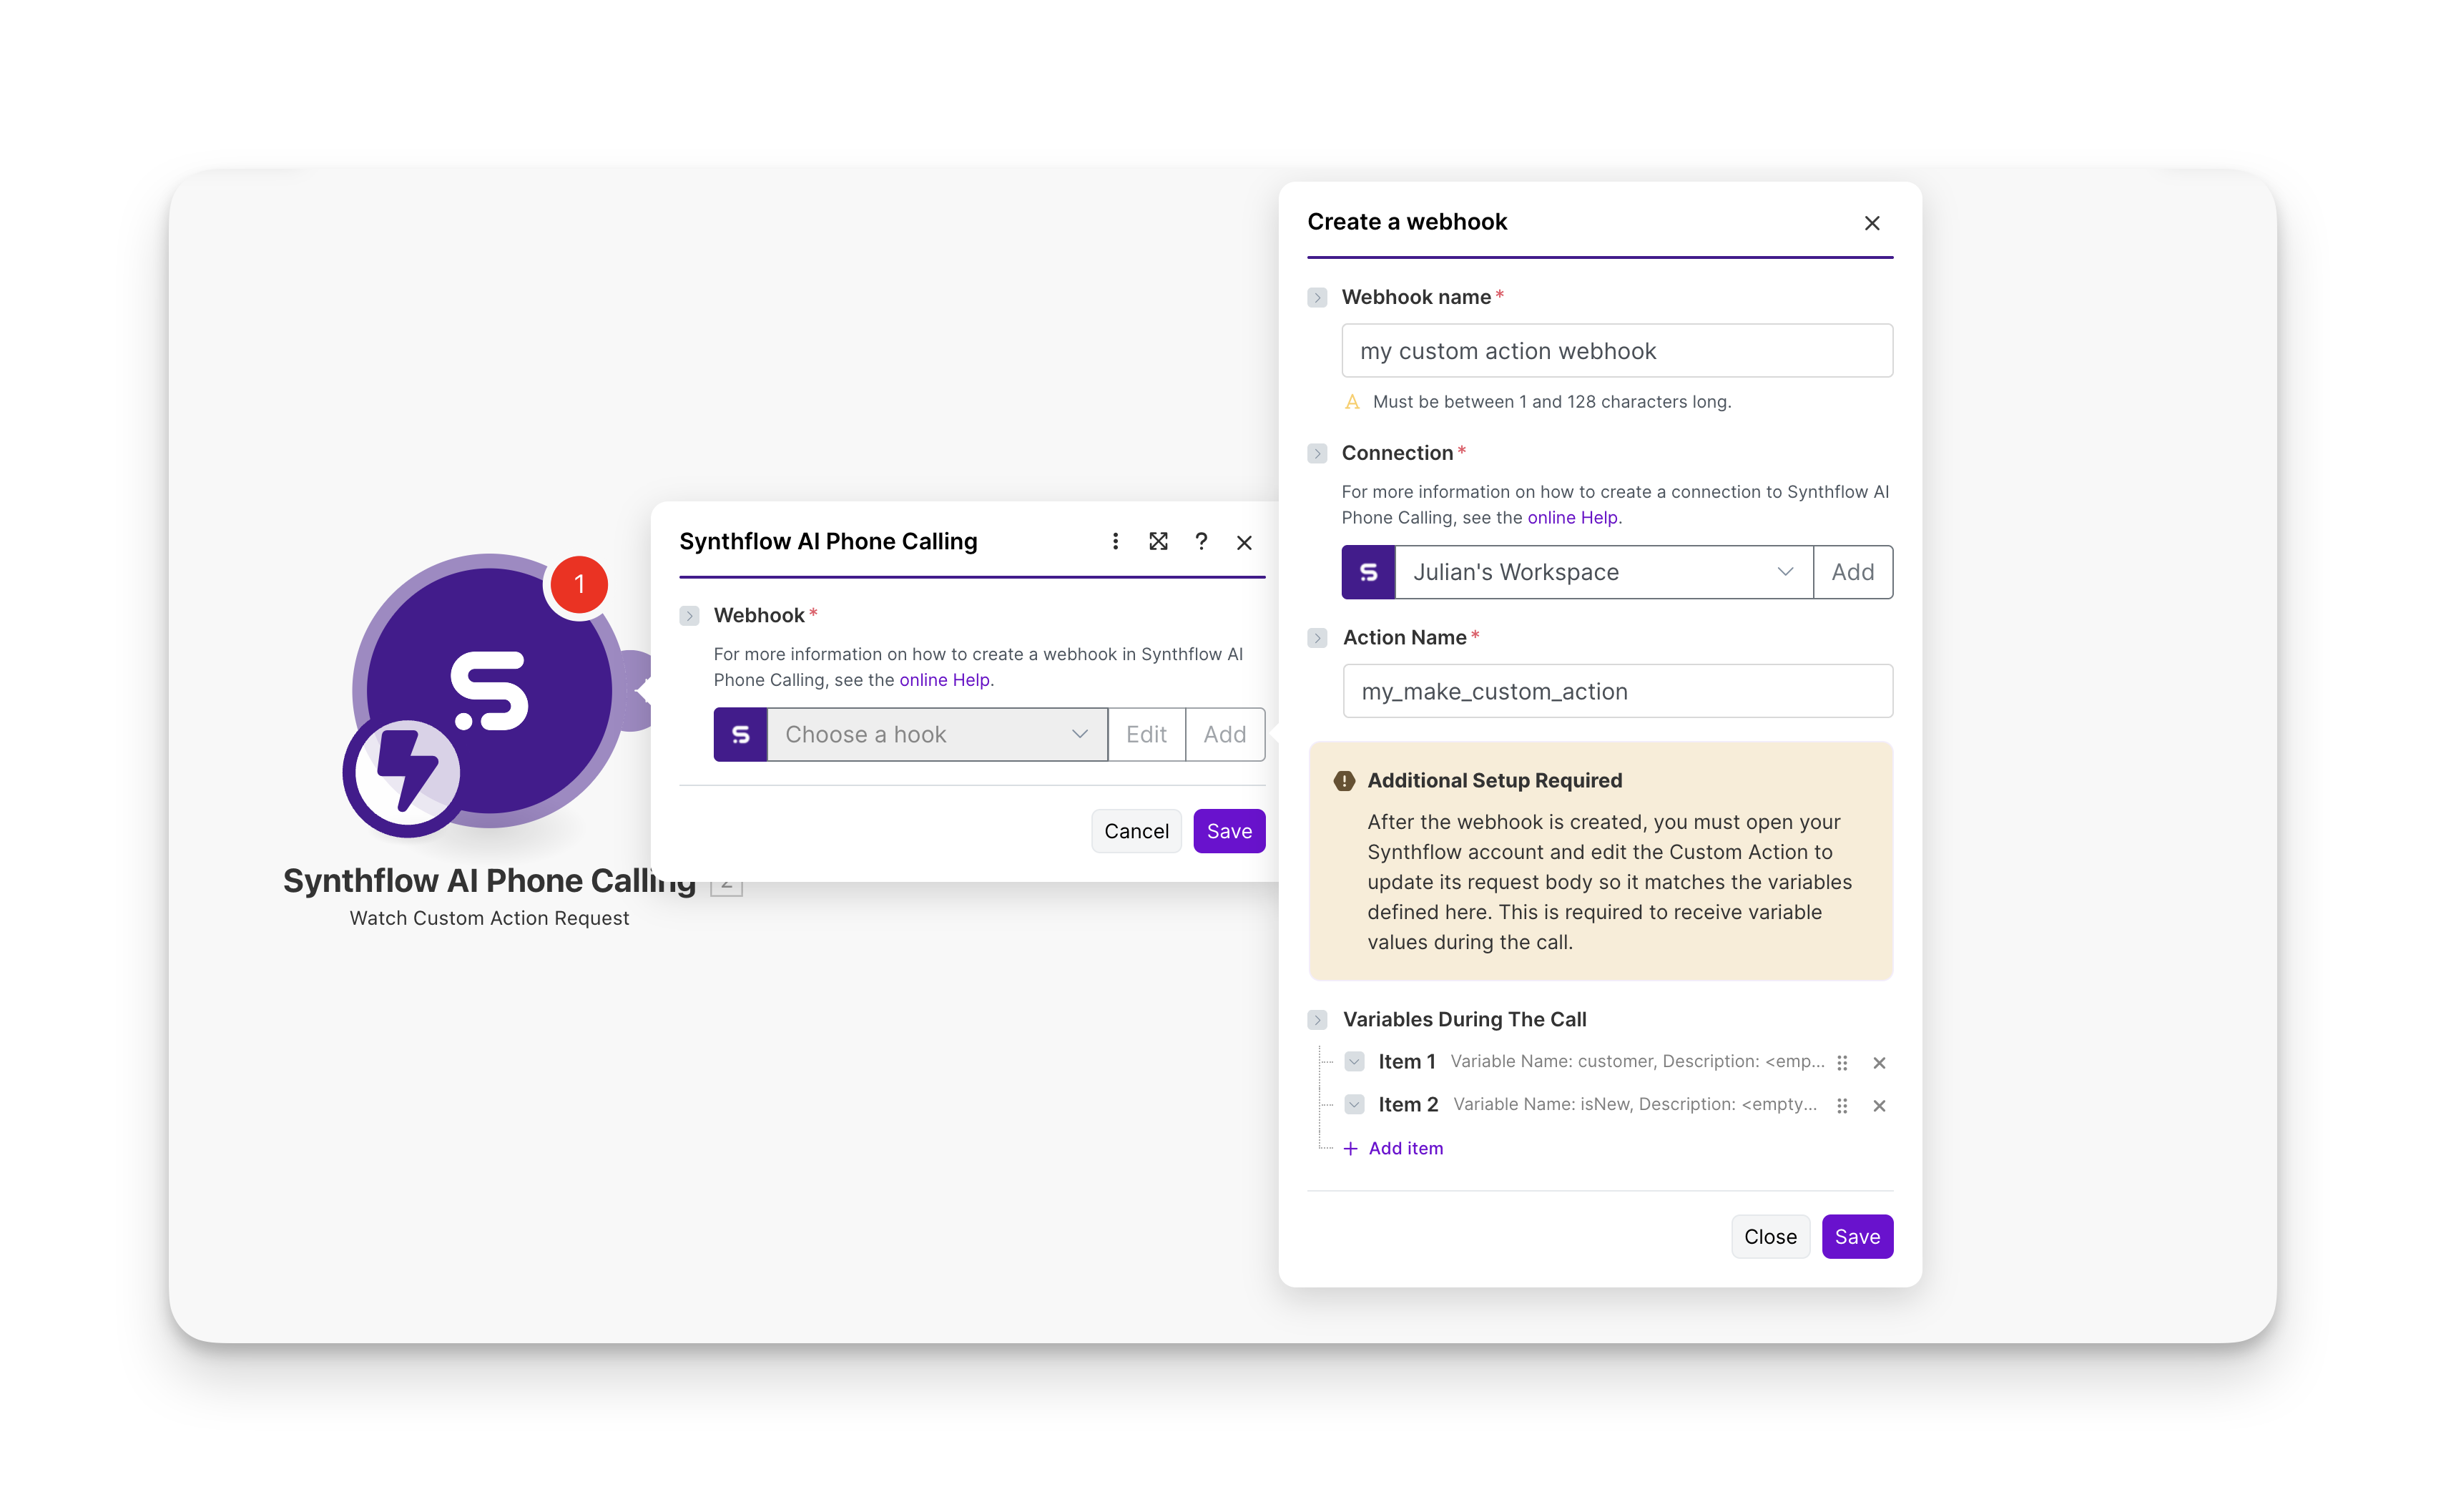
Use this trigger when a custom action request is sent from Synthflow. This trigger automatically registers a custom action webhook and exposes user-defined variables as output fields.
When you create the trigger module, Make automatically creates a custom action in your Synthflow dashboard using Create Action endpoint using the webhook URL that Make generates. The request body should include the user-specified parameters for the custom action:
- Action name
- Variables
After the webhook is created, you must open your Synthflow account and edit the Custom Action to update its request body so it matches the variables defined in Make. This is required to receive variable values during the call.
Here is a step-by-step process on how to configure the Watch Custom Action Request trigger:
Add Watch Custom Action Request as the first module in your scenario and create or select your Synthflow connection.
Specify the action name and variables for the custom action about to be created. In the create action endpoint, these variables refer to the variables_during_the_call.
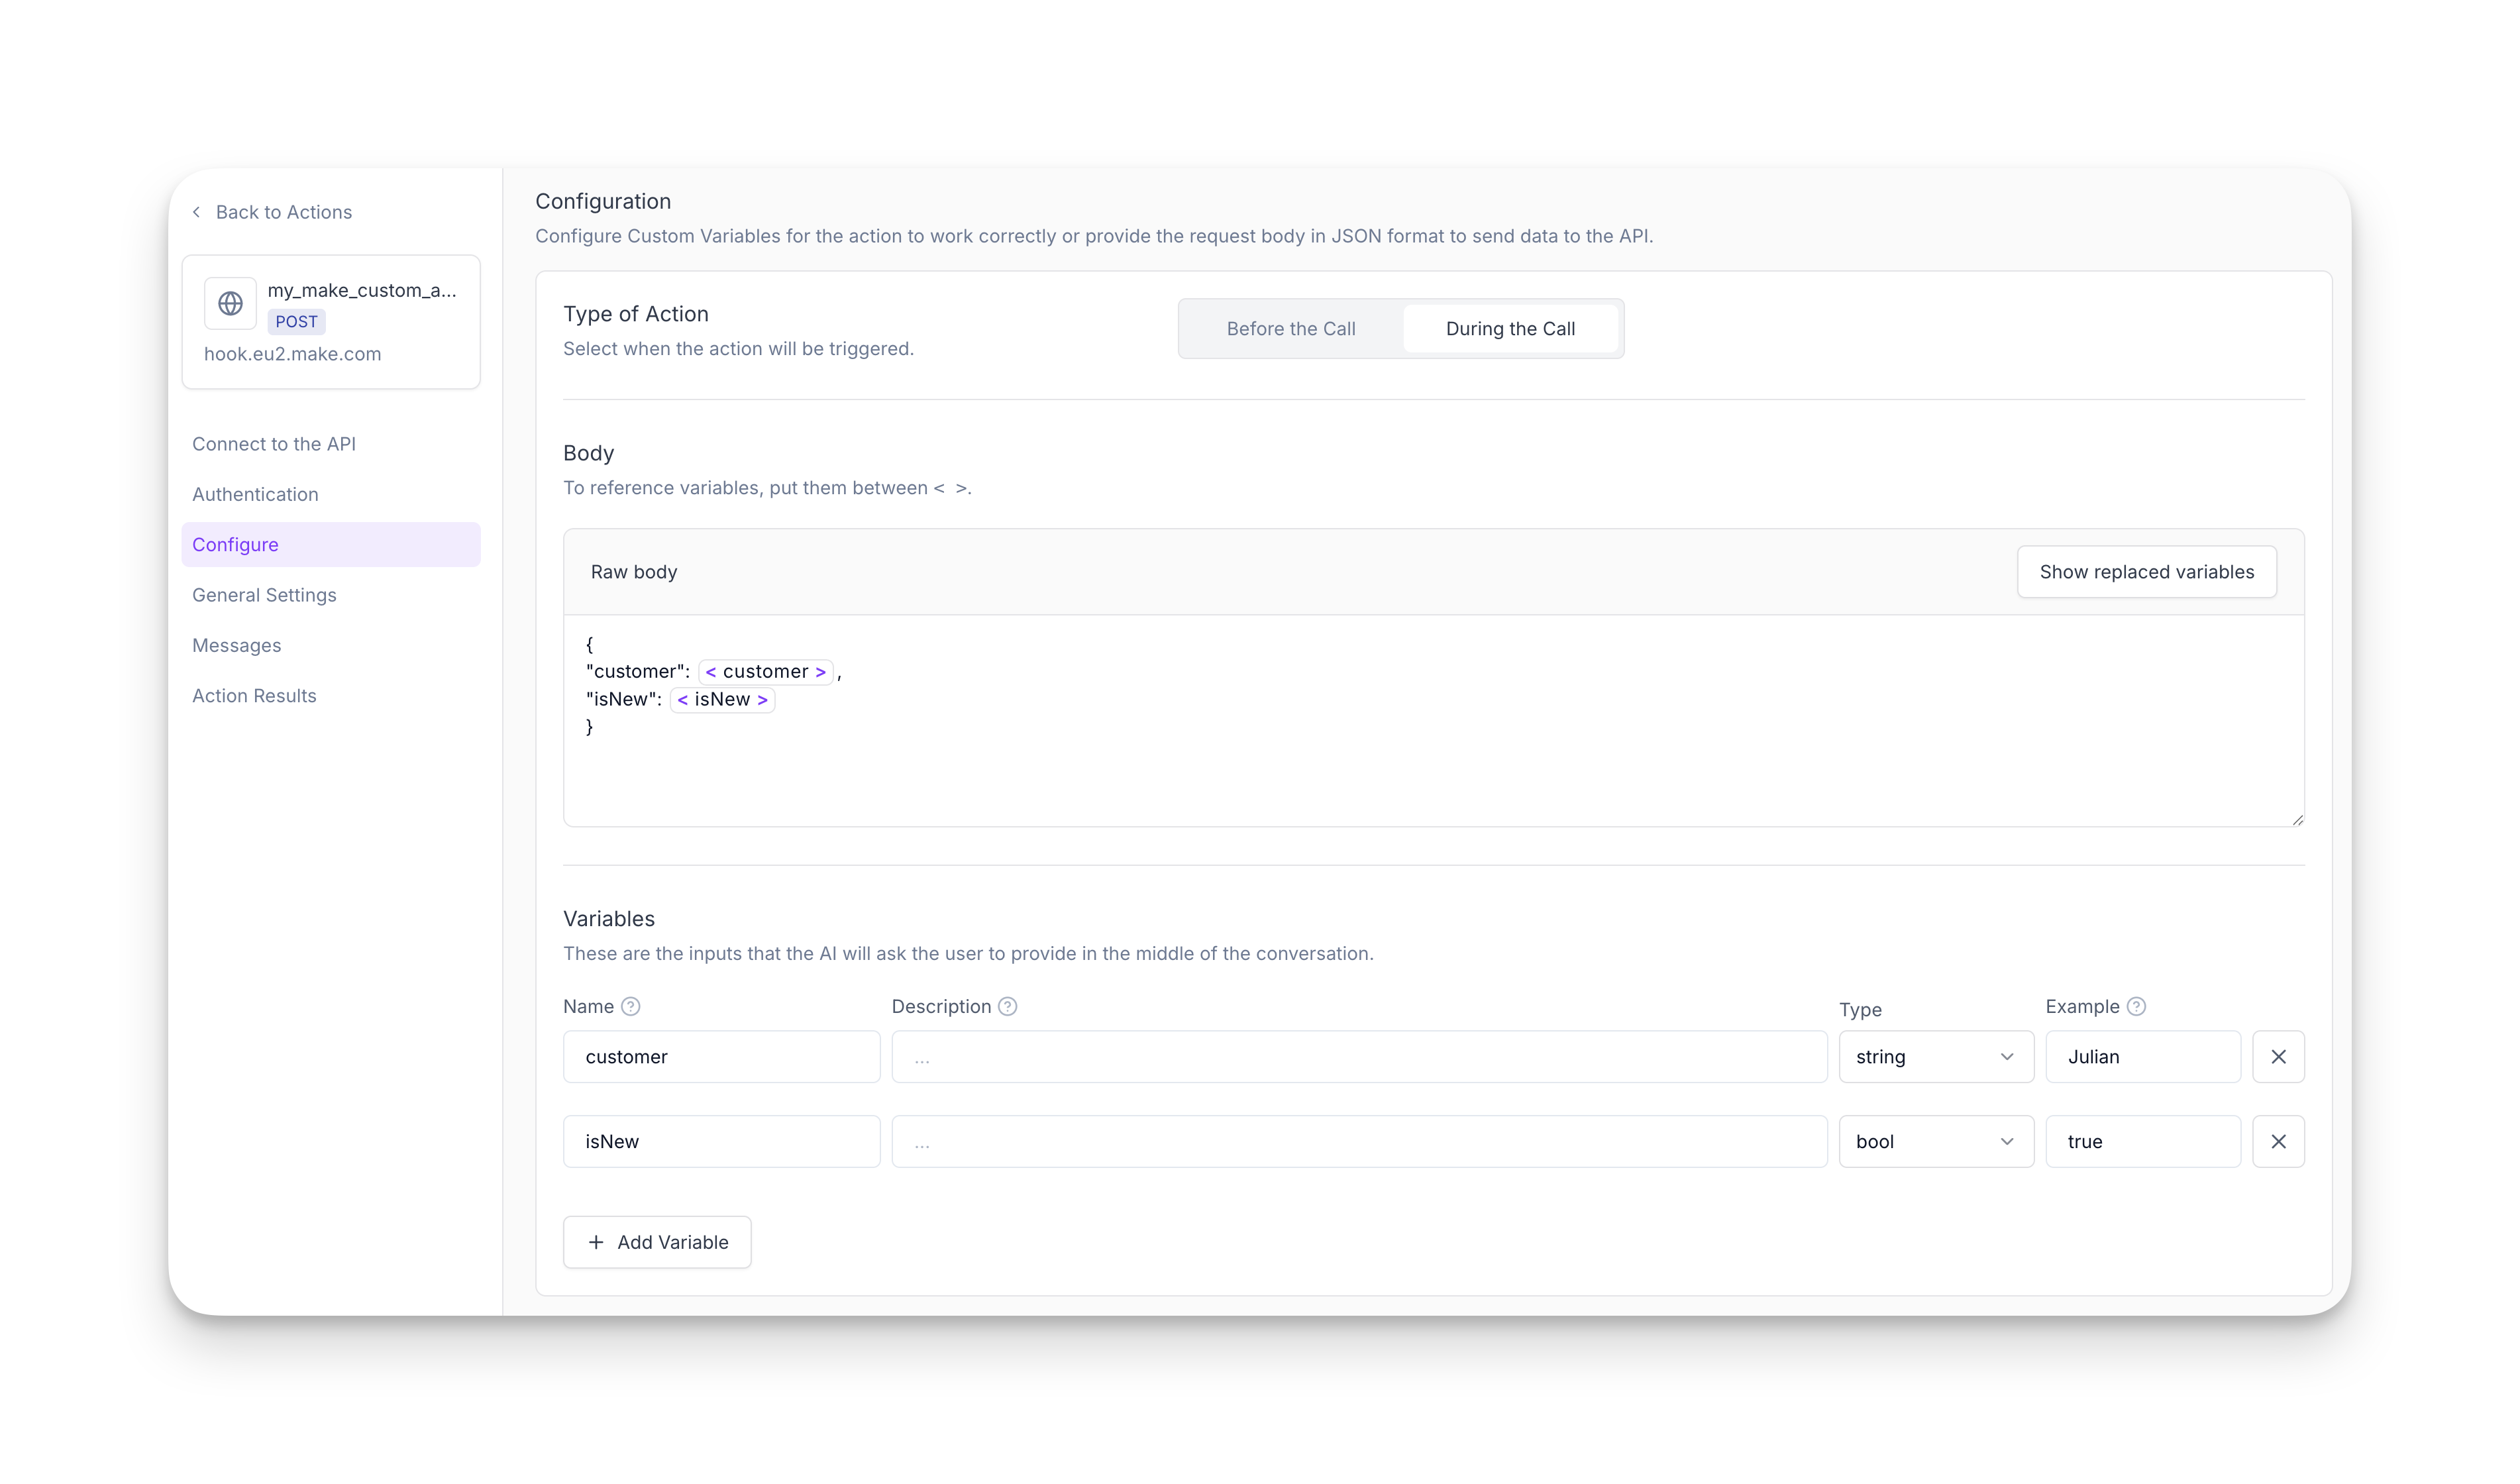
Click Save. Now your custom action is created. Head over to your Synthflow account and adjust the body to take your variables into consideration. Verify the Make webhook URL is the same as the endpoint URL of your newly created custom action.
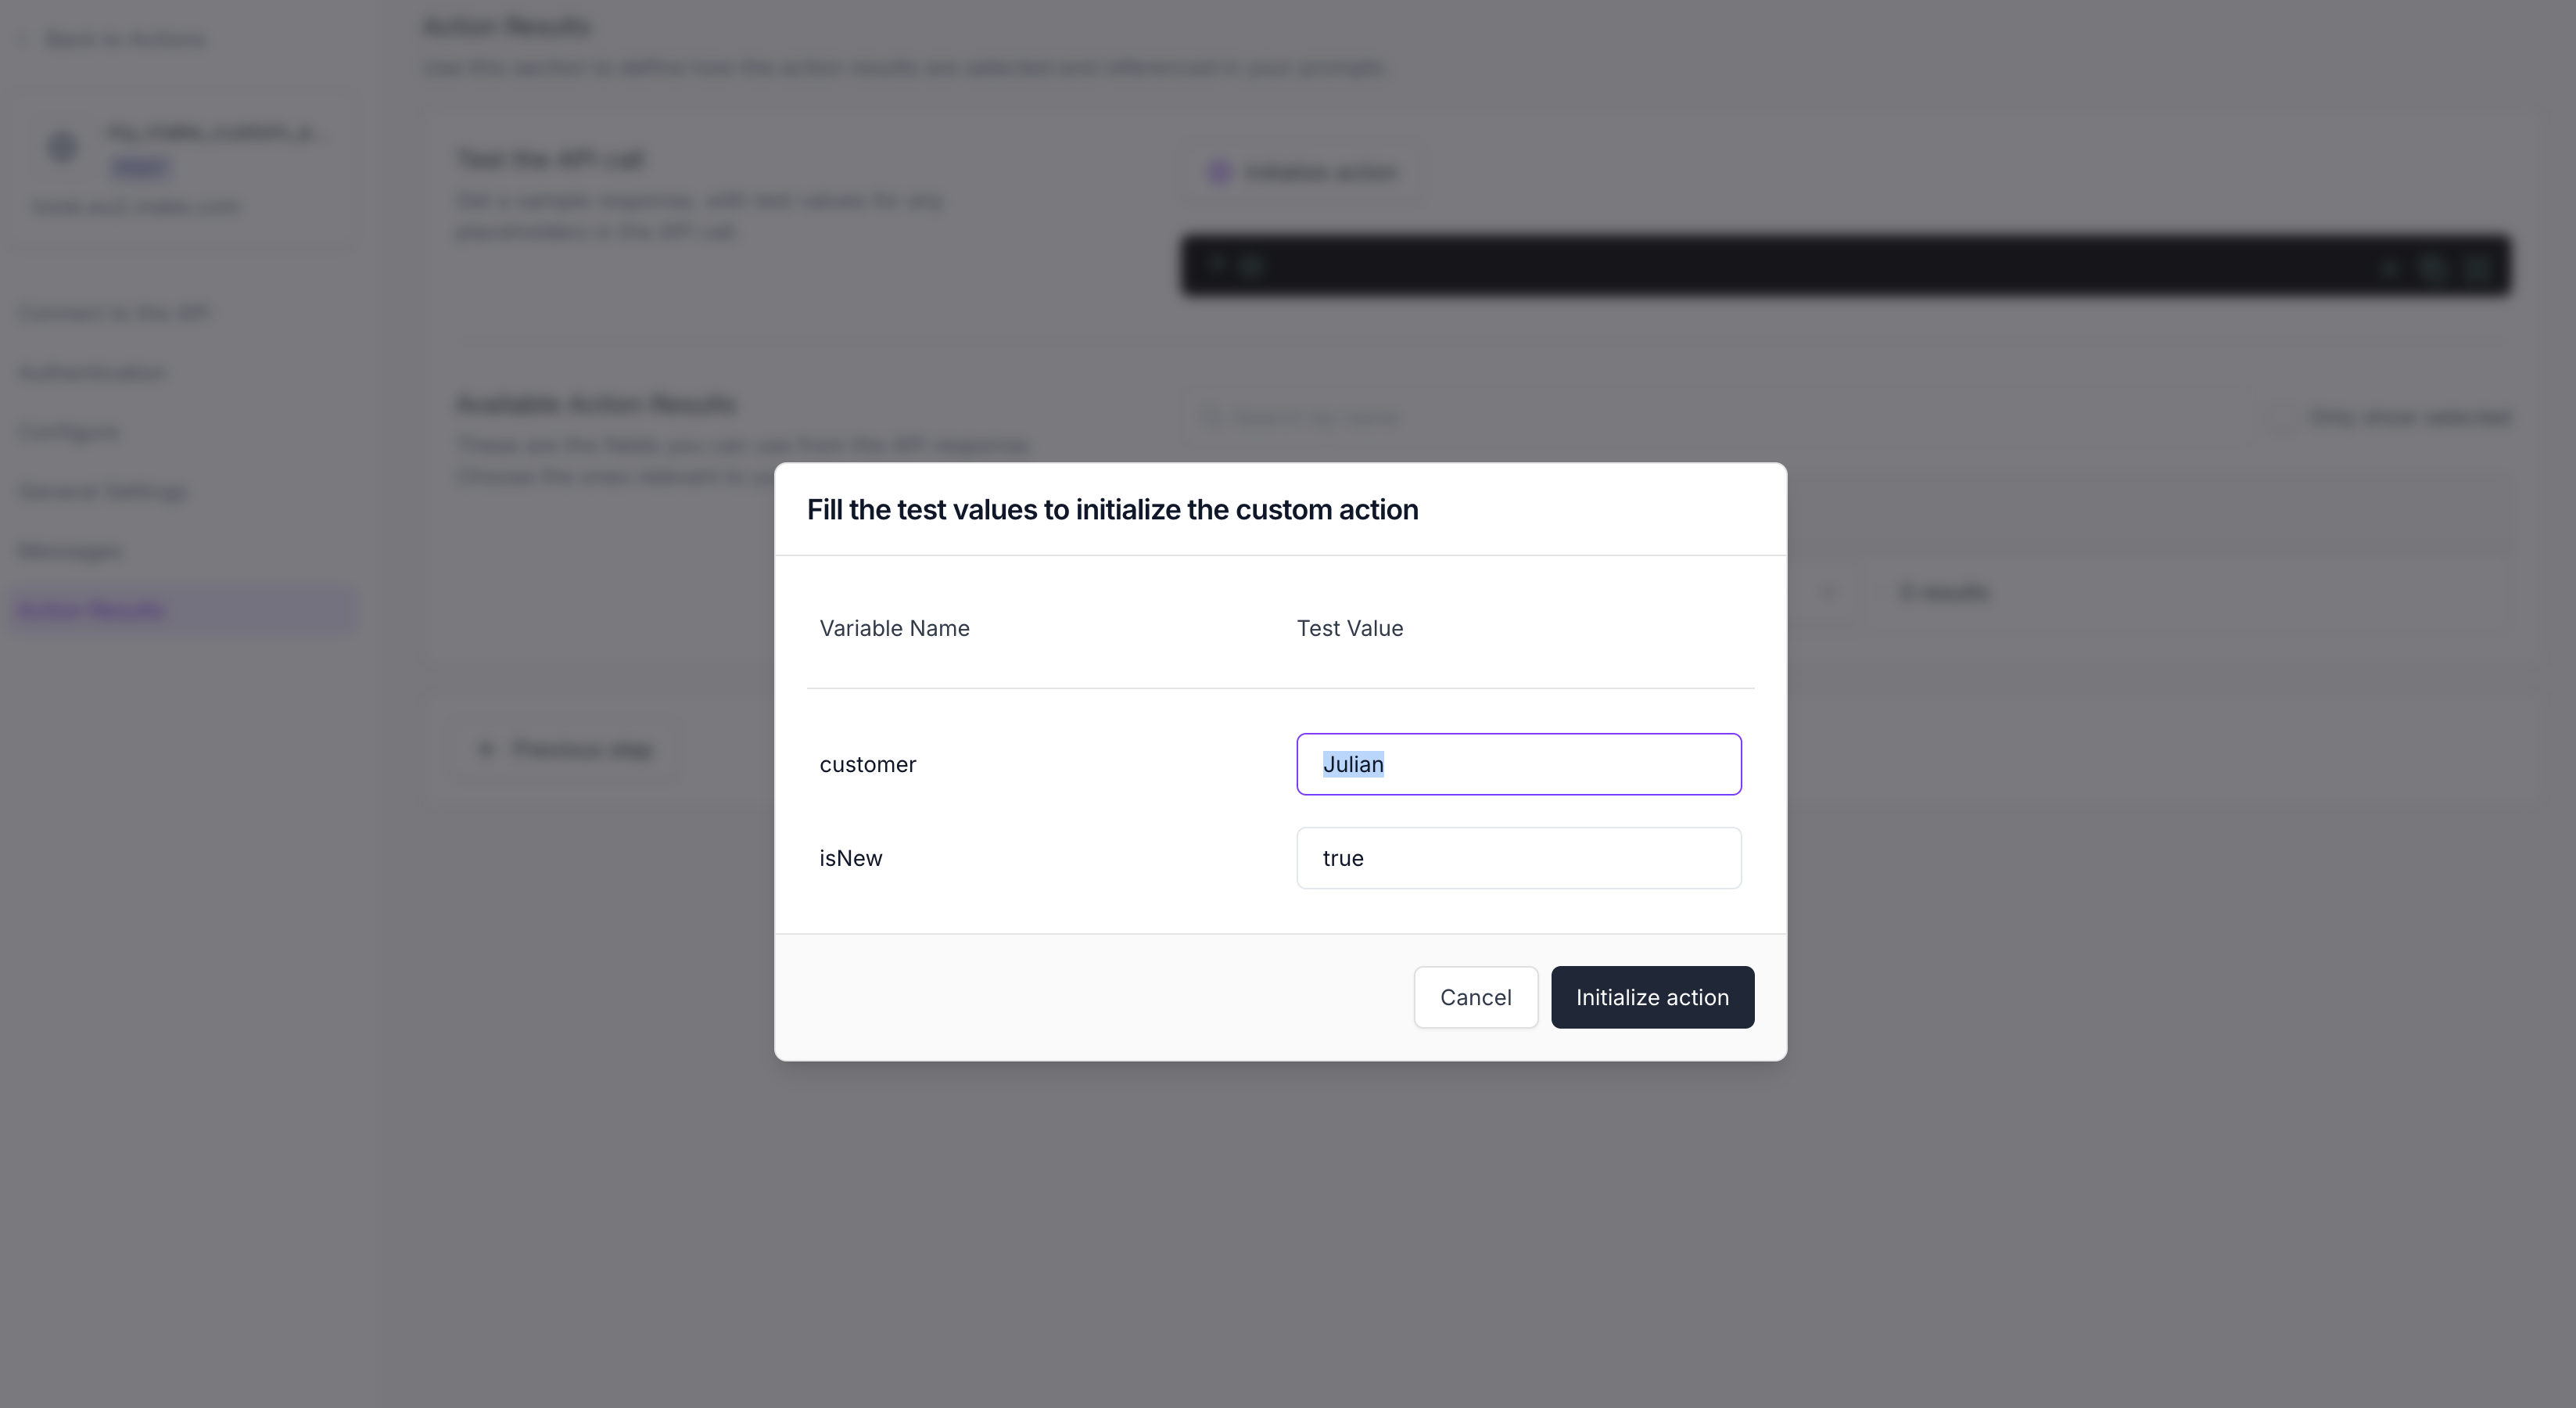

Once all these steps are completed, you may reference the webhook output data in your next workflows.
Watch Post Call Event
Use this trigger when a Synthflow call ends. When a call is finished, and as long as your Synthflow voice agent has a post-call webhook attached, this trigger will receive the full post-call payload, including parameters such as:
- call_id
- status
- duration
- transcript
- metadata
- executed actions
In this section we will expand further on how to configure the Watch Post Call Event in Make. To learn more about Synthflow’s post-call webhook, click here.
Enter your Synthflow Agent ID that you wish to track calls from. The agent ID has a format similar to the one in the following image:
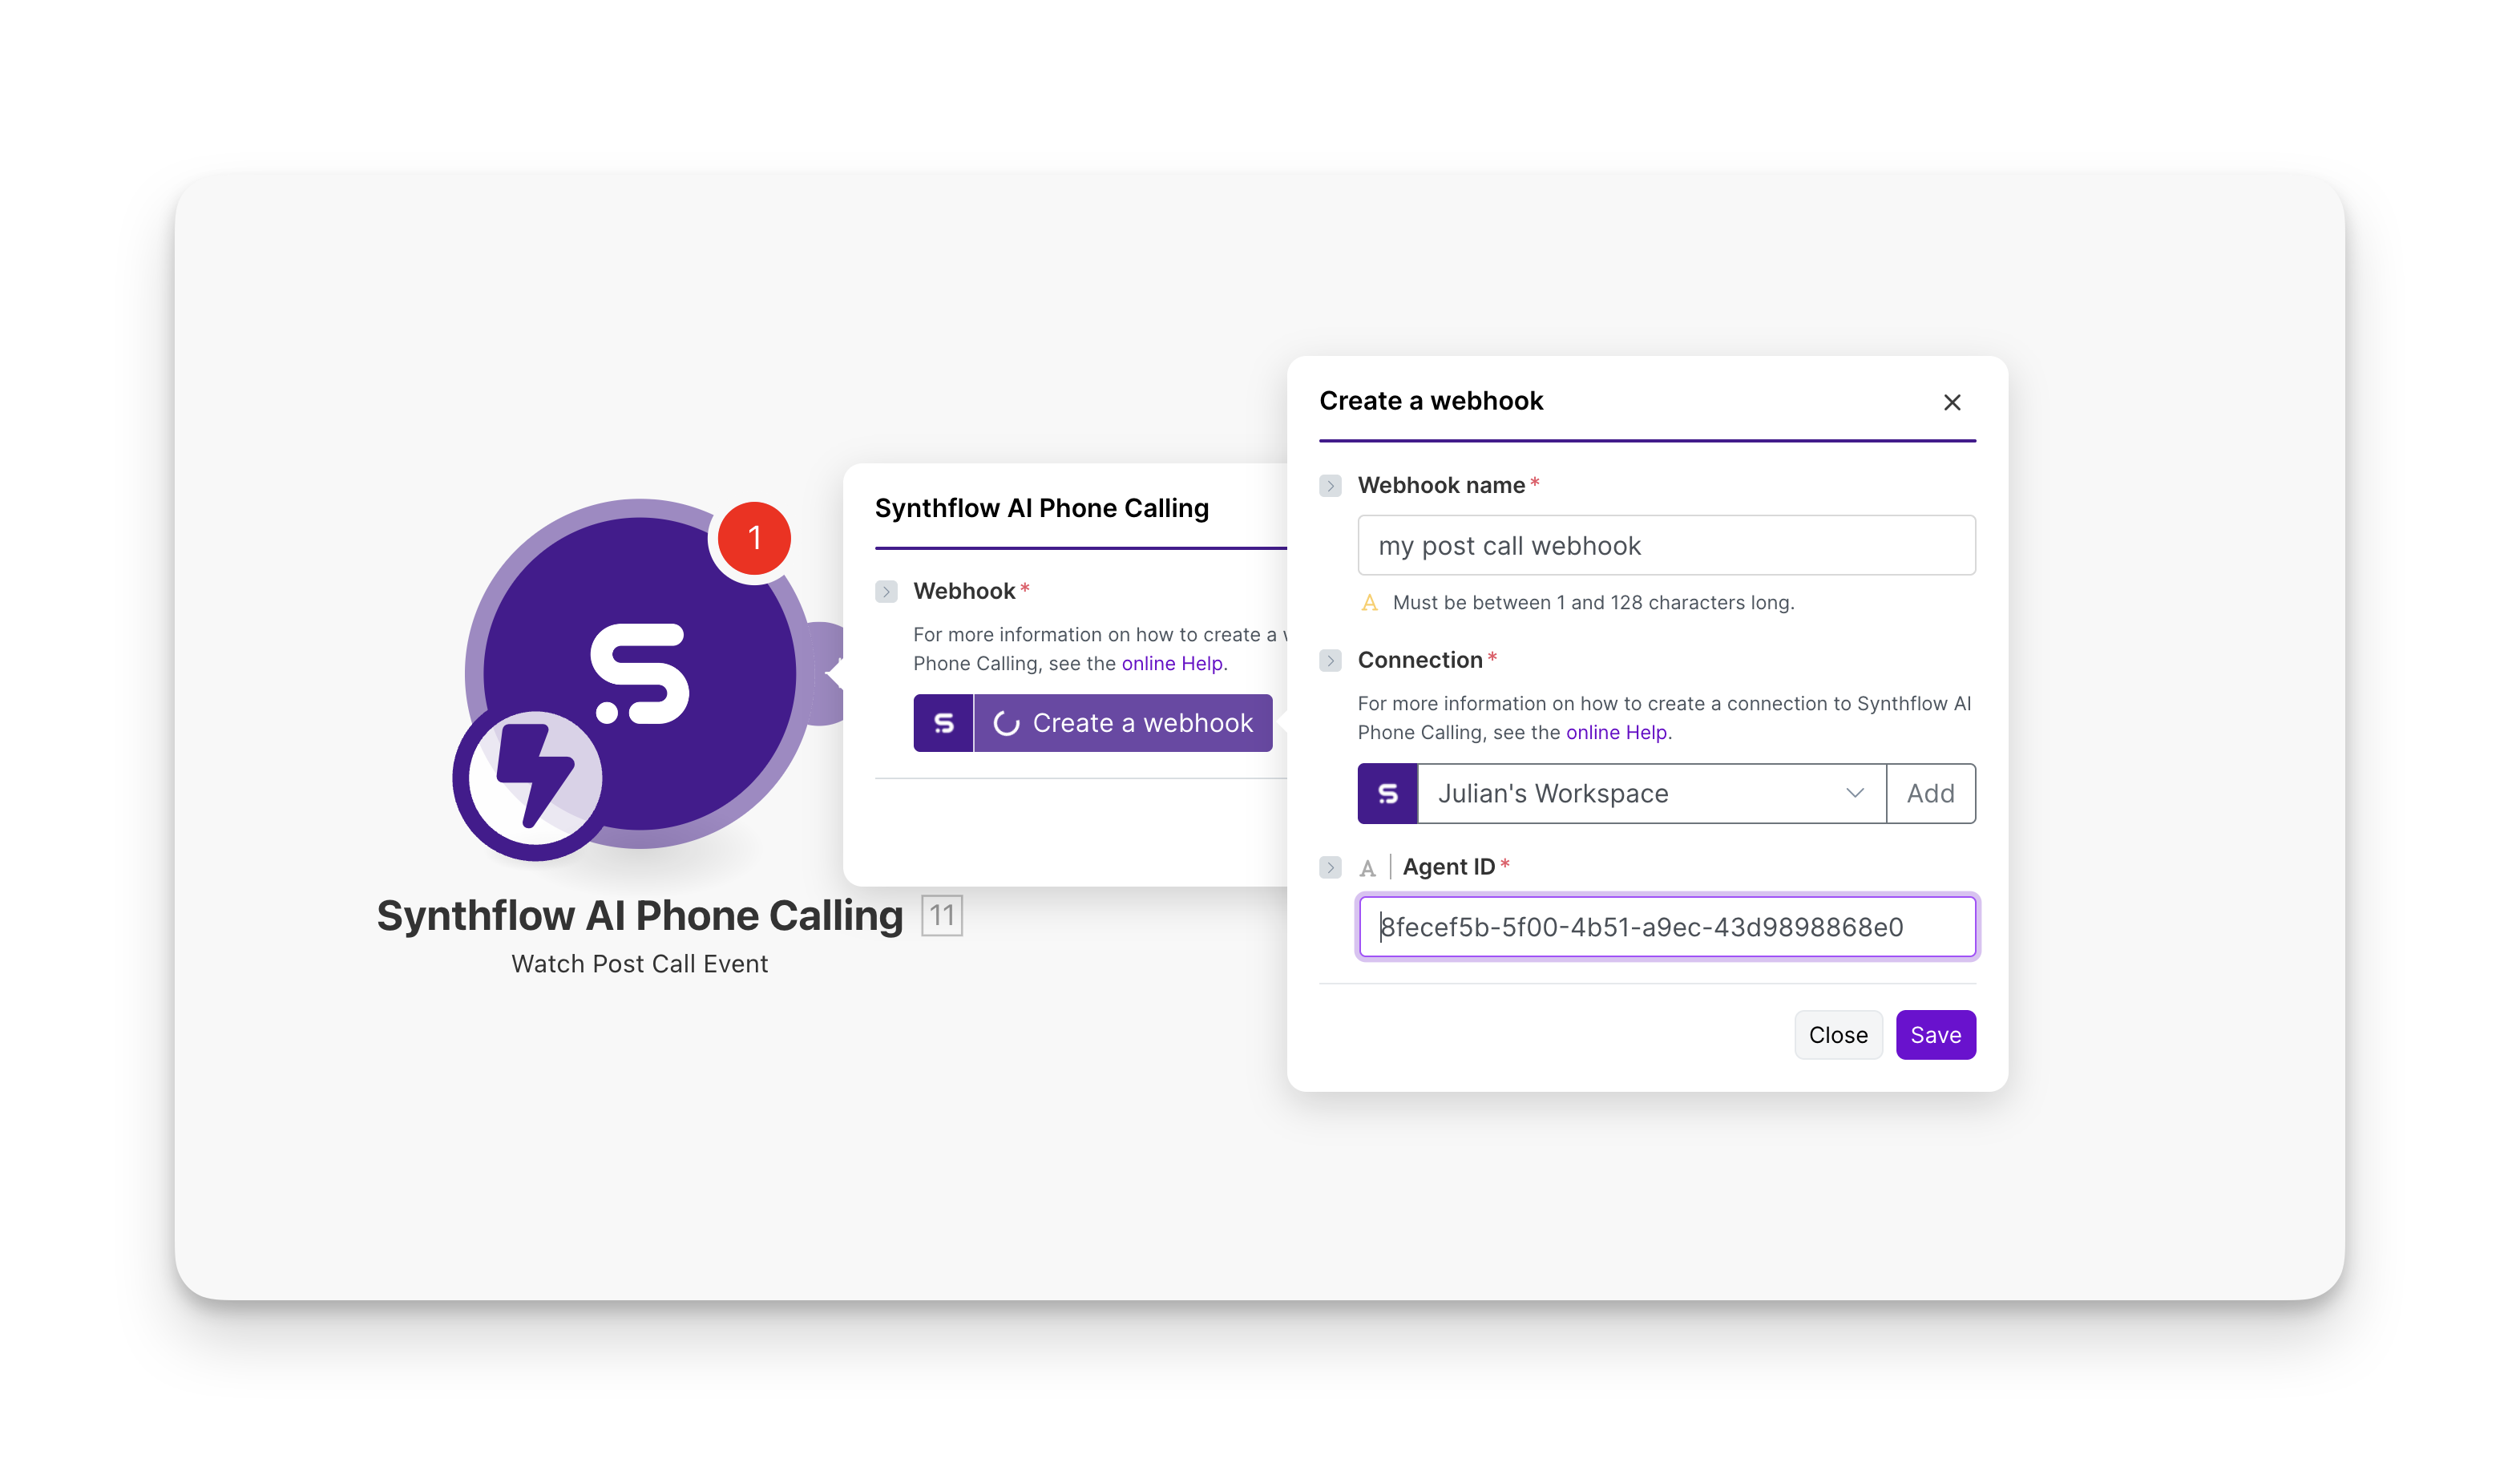
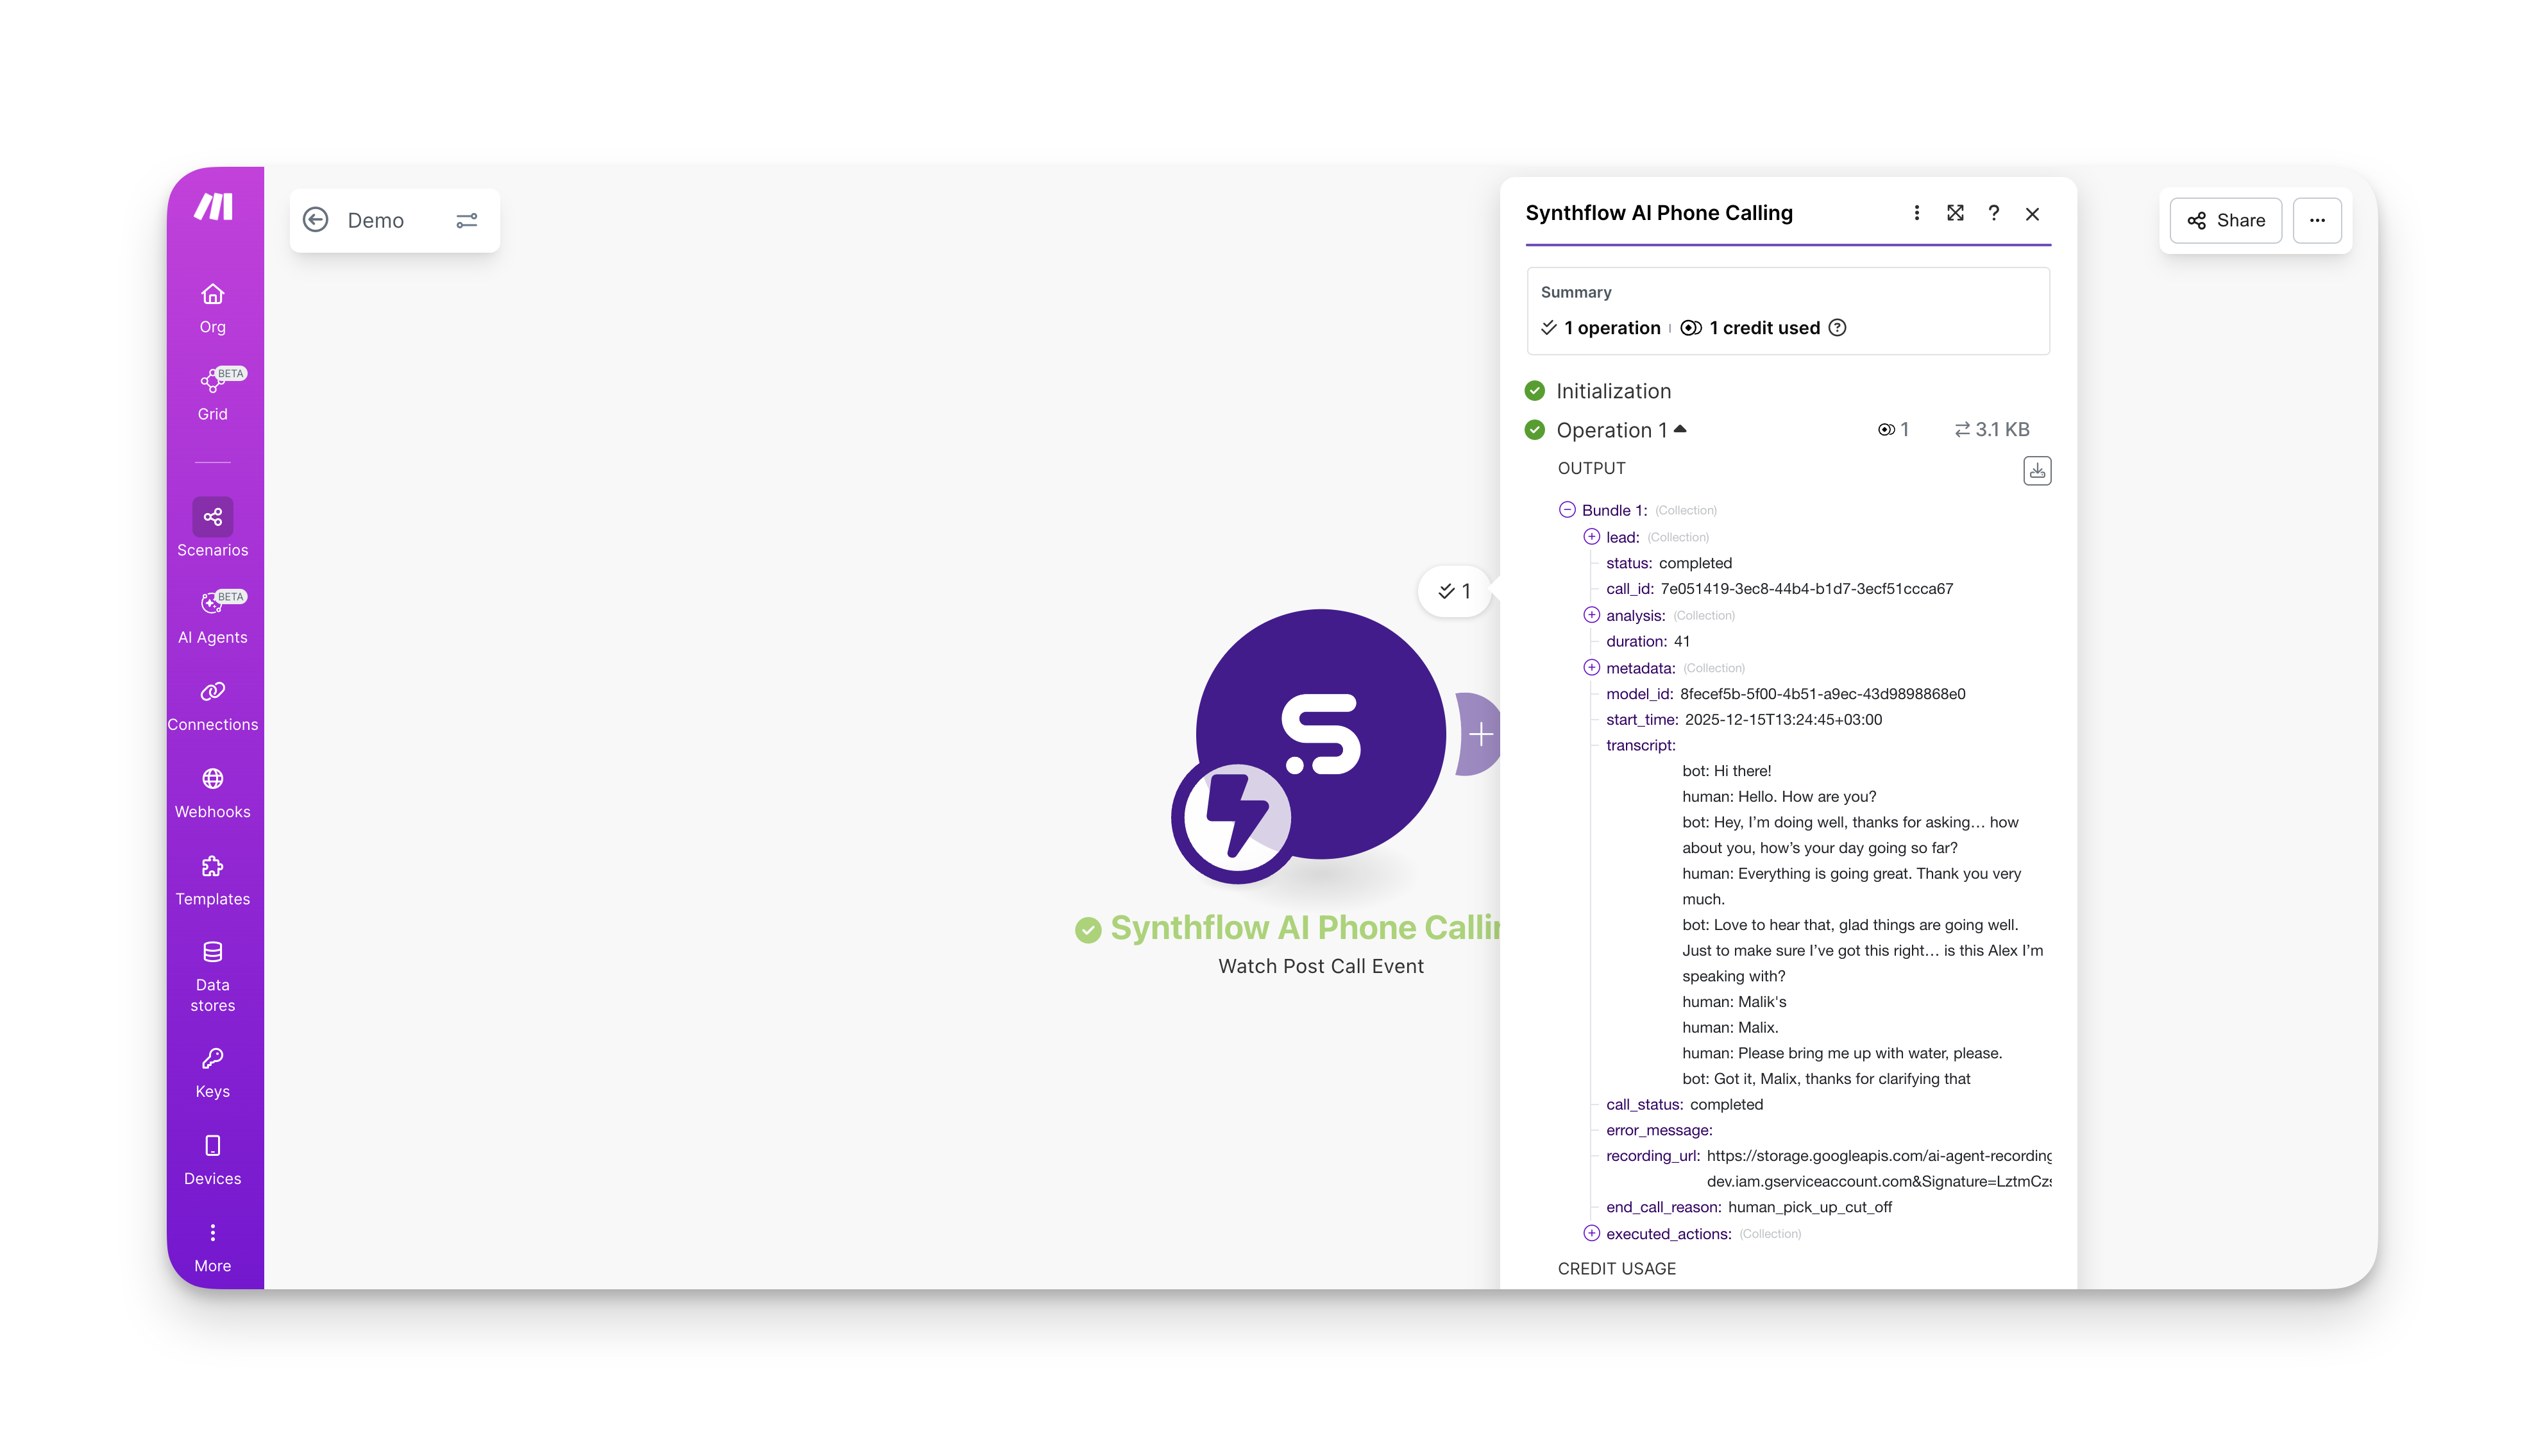
If your agent has the webhook URL attached, then all that’s left is to make a call to retrieve all the data from the post call event. Make sure your trigger is listening to new data to initialize it.
Once initialized, you can refer to fields like call_id, status, transcript, and other parameters to map them to your next modules.
Make an AI Phone Call
This action makes outbound calls from your Synthflow voice agent.
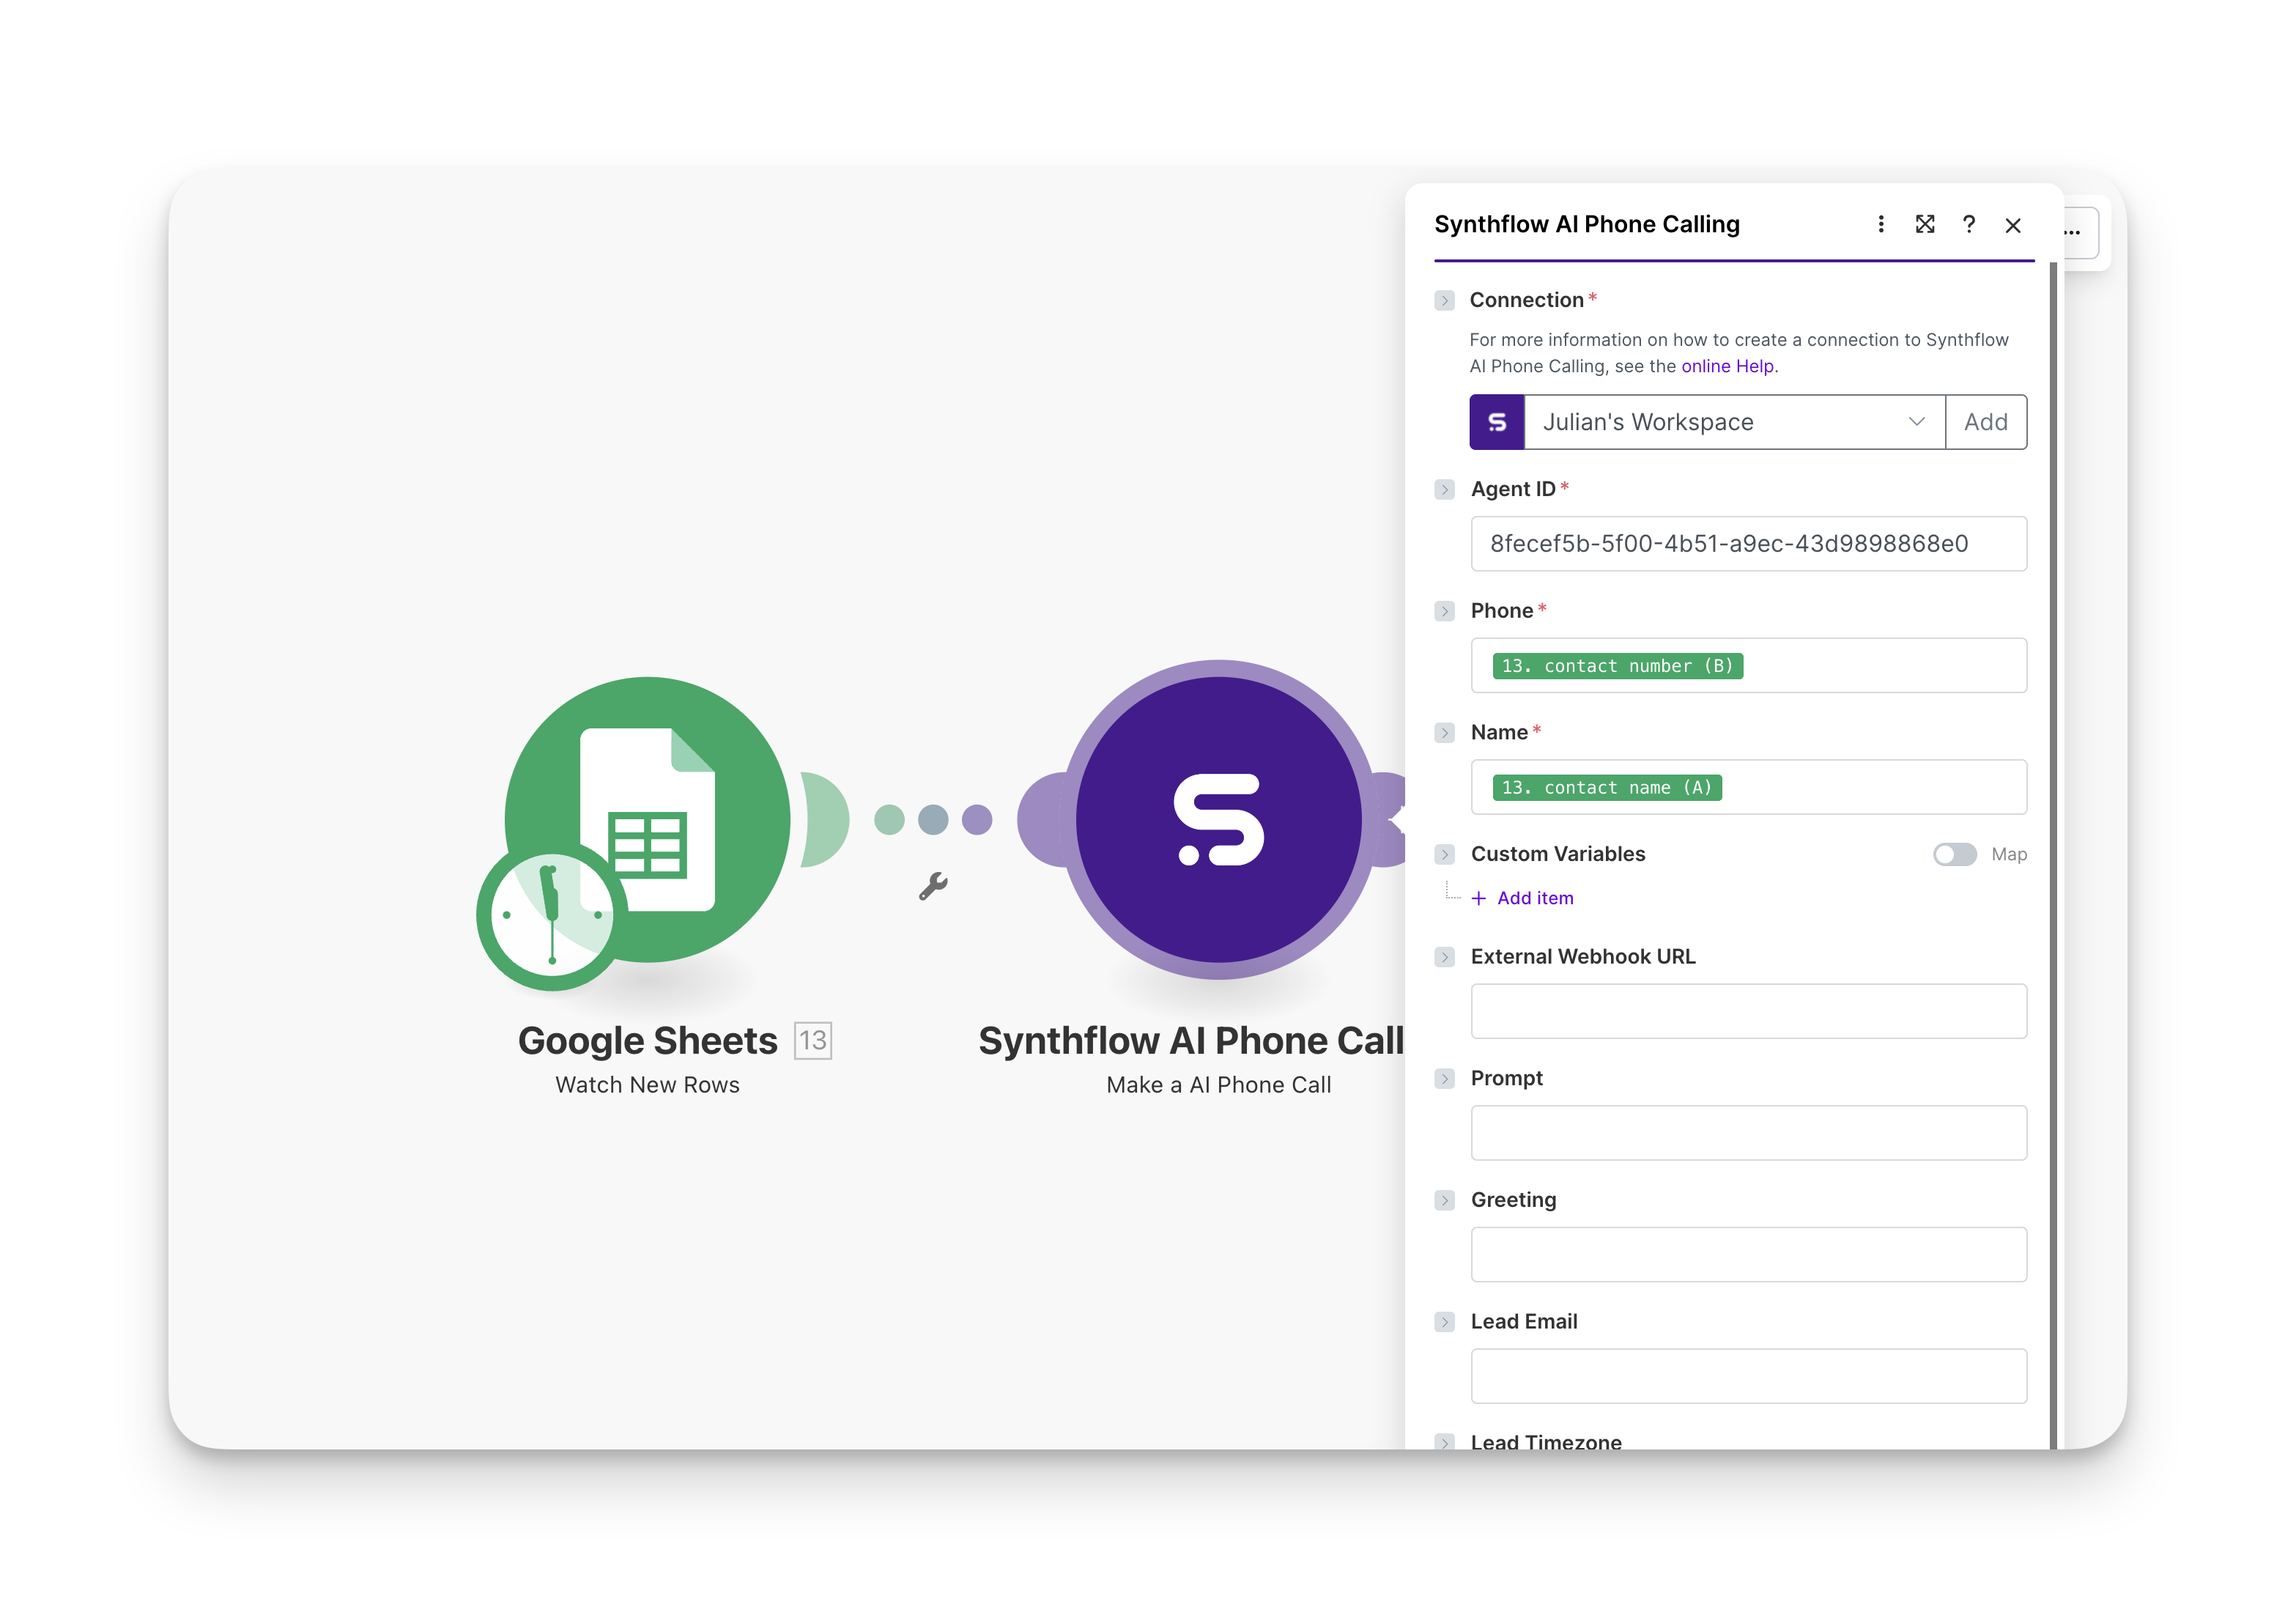
Firstly, add a trigger as your starting point. In this example, we will be adding the Watch New Rows trigger as a starting point.
Anytime a new row is added in the Google Sheets spreadsheet, we will be performing a phone call to the contact specified in the sheet.
Add the Make an AI Phone Call action in your scenario and select your Synthflow connection.
To initialize your action, specify the following mandatory fields:
- Agent ID
- Phone number to call to
- Contact name
Optionally, you may add other parameters such as:
- Custom variables
- External webhook URL
- Prompt
- Greeting
- Lead email
- Lead timezone
This action is using essentially the make a phone call endpoint. Please refer to it to understand better what each field means and how it can be used.
Once all required parameters are specified, you may initialize your action. If the phone number specified receives a call from your Synthflow agent number, then your action is successfully configured.
To know more details about the calls made by your agent, you can use the call logs in your Synthflow dashboard.

Make an API Call
Use this when you need an endpoint that is not yet templated in the UI.
Example scenarios
- Trigger an AI call when a new CRM lead is created, then update the record with call outcomes.
- Route custom action requests to Make, call external APIs, and return results to the live conversation.
- Capture post-call transcripts and scores, then log them to your data warehouse or send alerts.
- Launch batch outreach by iterating over rows in a spreadsheet and placing calls via your agent.
FAQ
What permissions does the Synthflow connection need in Make?
The Synthflow connection uses your API key, so it inherits the permissions of that key. Create separate keys per environment and rotate them regularly. Remove unused keys in Integrations → API Keys to reduce risk.
How do I test a scenario without placing live calls?
Use a dedicated test agent with a low-cost number and your own phone number, or point the action to a sandbox agent ID. You can also set the external_webhook_url to a request bin to verify payloads before enabling production routing.
Why isn’t my custom action payload showing up in Make?
After Make creates the custom action, open it in your Synthflow dashboard and ensure the request body matches the variables you defined in Make. Reinitialize the trigger while it is in listening mode to refresh the schema.
How do I handle retries for post-call webhooks?
Make receives post-call webhooks as they are sent. If a run fails, enable error handling in the module settings (e.g., automatic retries or manual replay) and confirm the webhook URL stays attached to the agent so subsequent calls continue to deliver.
Can I fan out to multiple downstream systems?
Yes. Add routers after your trigger to branch by status, transcript signals, or metadata. Each branch can call other APIs via Make an API Call or push to apps like CRM, Slack, and data warehouses.