SIP transfers
Transfer calls to SIP-compatible endpoints.
SIP transfers hand off the active call to SIP endpoints such as PBX systems, SIP phones, or softphones. The destination is a SIP URI rather than a phone number, which makes SIP transfers the right choice when TEL handling is unsupported by your carrier or when you need to attach metadata to the transfer leg.
The shared building blocks of any transfer (modes, caller ID behavior, outcome states, hold experience) live on the Call transfers overview. This page covers the settings and behaviors that are specific to SIP transfers.
Prerequisites
- The SIP endpoint must be reachable from Synthflow.
- SIP (UDP/TCP 5060) and RTP ports open and forwarded.
Setup
Configure the transfer mode (warm with message or summary, or cold) and the answer timeout.
Cold transfers use SIP REFER, which requires telephony-provider support. Twilio and Telnyx are confirmed; with other providers, prefer a warm mode (which uses SIP INVITE).
Custom X-headers
You can define custom X-headers in the UI to pass additional metadata with the SIP INVITE. This is useful for routing logic, caller identification, or integration with your PBX.
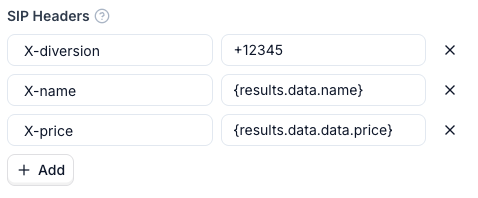
Header values can be populated using variables or info extractors.
Variables
Use {} syntax to inject dynamic values into a header.
If a custom action runs before the transfer, the transfer waits for that action to resolve so its output is available in the SIP headers.
Info extractors
An info extractor lets the AI agent pull a specific piece of information from the conversation and pass it as a header value. Each extractor has two fields:
The agent evaluates the prompt against the conversation at transfer time and writes the result into the specified header. Use info extractors when the value you need does not exist as a variable, for example a caller’s intent, sentiment, or a summary of the conversation so far.
Example: passing call context for agent handoff
A common pattern is to combine variables and info extractors so the human agent receives full context on transfer.
Field requirements
Avoid adding too many X-headers. Excessive headers increase the size of SIP INVITE packets, which can lead to packet fragmentation and loss, especially over UDP. Keep headers minimal and only include data your PBX or routing logic actually needs.
Supported SIP URI formats
Security
Synthflow supports Access Control Lists (ACL) to secure inbound SIP calls. Configure your SIP server to accept connections only from Synthflow’s IP addresses. Username and password authentication is not currently supported for inbound call transfers.
Related links
FAQ
Why does Synthflow use SIP REFER for cold transfers and SIP INVITE for warm transfers?
A cold transfer hands the call off entirely to your telephony provider via SIP REFER, which is why the receiving party sees the original caller’s number. A warm transfer needs Synthflow to stay in control to deliver the whisper or summary, so it creates a new outbound leg over SIP INVITE, and the agent’s number is shown instead. See Caller ID.
My PBX rejects the SIP REFER. What should I do?
Switch the transfer mode to warm so Synthflow uses SIP INVITE instead, or configure your PBX to accept SIP REFER from Synthflow’s IP range. SIP INVITE is universally supported.
Can I authenticate inbound SIP transfers with a username and password?
Not at this time. Use IP-based ACLs against Synthflow’s outbound IP addresses to secure inbound traffic.
What happens if the SIP endpoint does not respond?
The transfer follows the standard outcome states. Cold transfers end the call on failure; warm transfers let the agent retry, fall back to an alternate destination, or resume the conversation.