RingCX
RingCX supports Intelligent Virtual Agent (IVA) integrations over SIP, letting you route voice queue calls to a Synthflow AI agent. You create an IVA integration in RingCX, import the workflow number into Synthflow with the RingCX provider, build a workflow that hands calls to Synthflow, and use the JavaScript node in Workflow Studio to pass caller context to the agent.
Prerequisites
- A RingCX account with admin access.
- A Synthflow account on the Enterprise plan with a deployed agent.
- A RingCX workflow channel number to use as the SIP URI.
Import the number into Synthflow
Before configuring RingCX, import the workflow channel number into Synthflow.
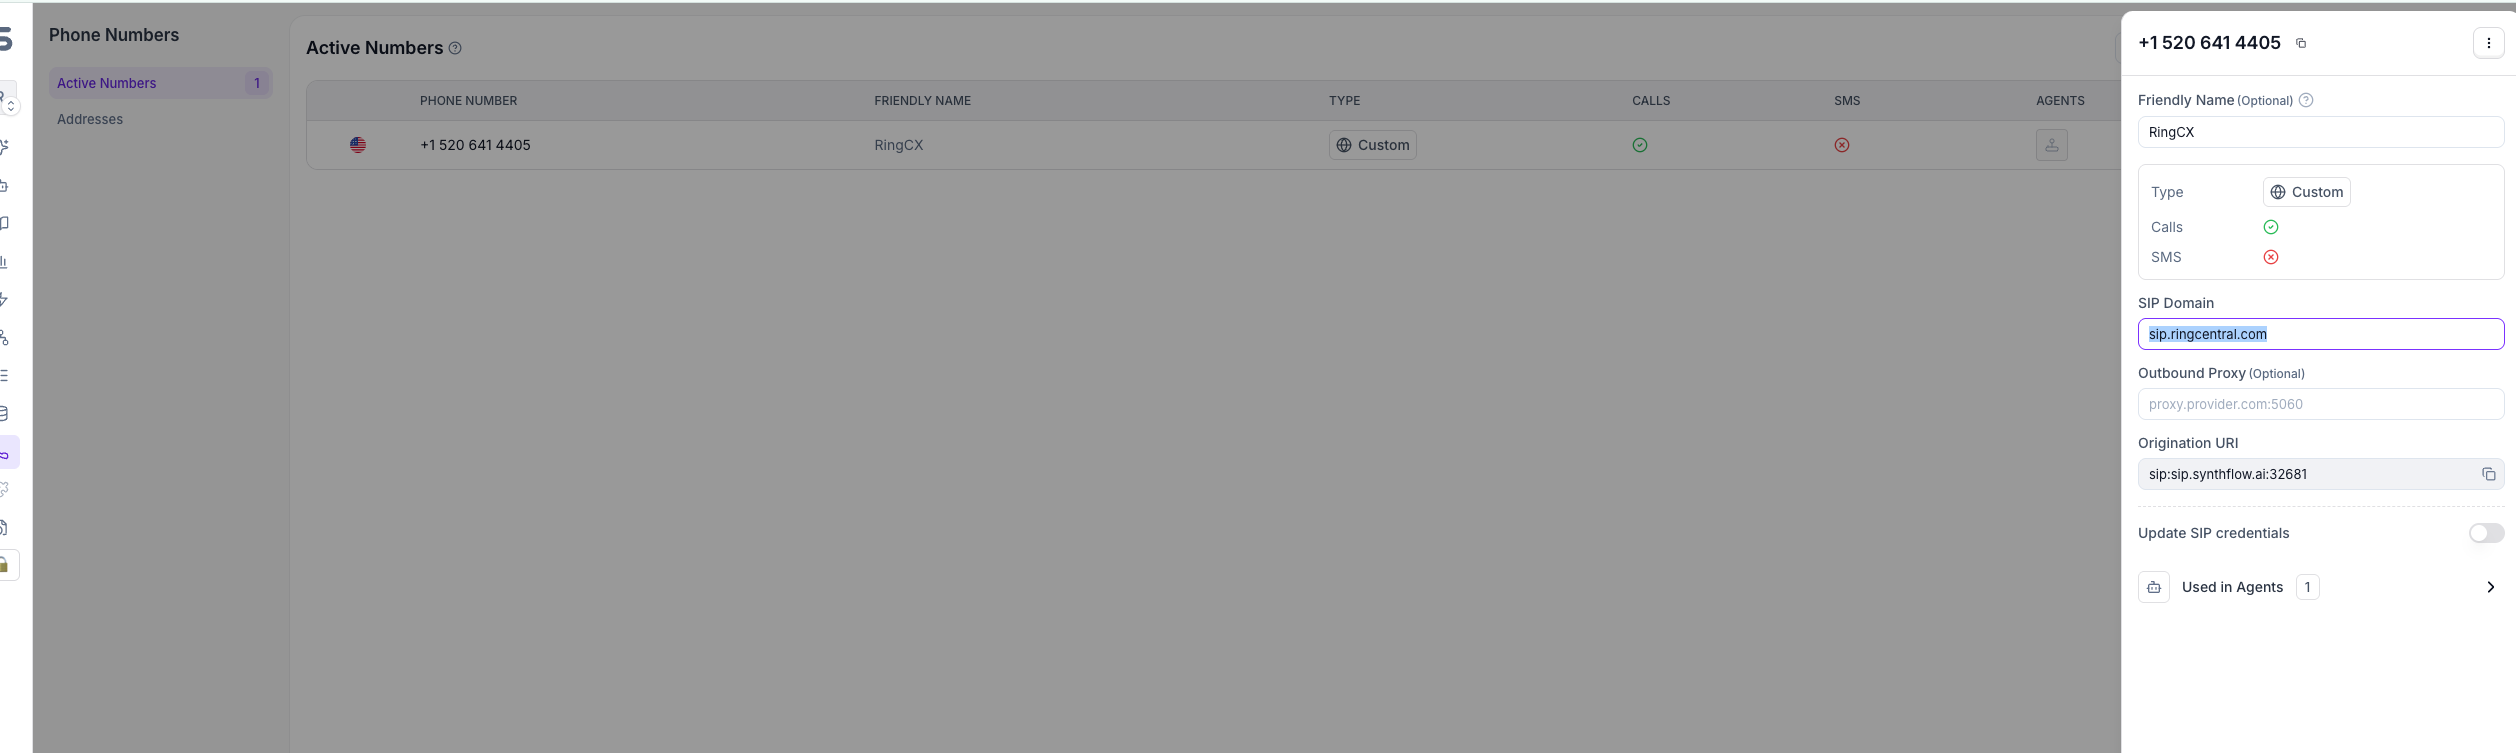
- In the Synthflow dashboard, go to Phone Numbers and click Import Phone Number.
- Configure the following fields:
Synthflow automatically sets the SIP domain to sip.ringcentral.com.
- Click Import to save the number.
After importing, the Origination URI field shows sip:sip.synthflow.ai:32681. This is the address RingCX sends calls to and is auto-populated by Synthflow.
- Open the agent you want to receive calls, go to the Configure tab, scroll to the Phone number section, select the RingCX number you imported, and click Save.
One phone number can be assigned to one inbound agent at a time. If you need to reassign the number, remove it from the current agent first. For more on number management, see Phone numbers.
Create the IVA integration in RingCX
- Sign in to RingCX and click the Admin tile.
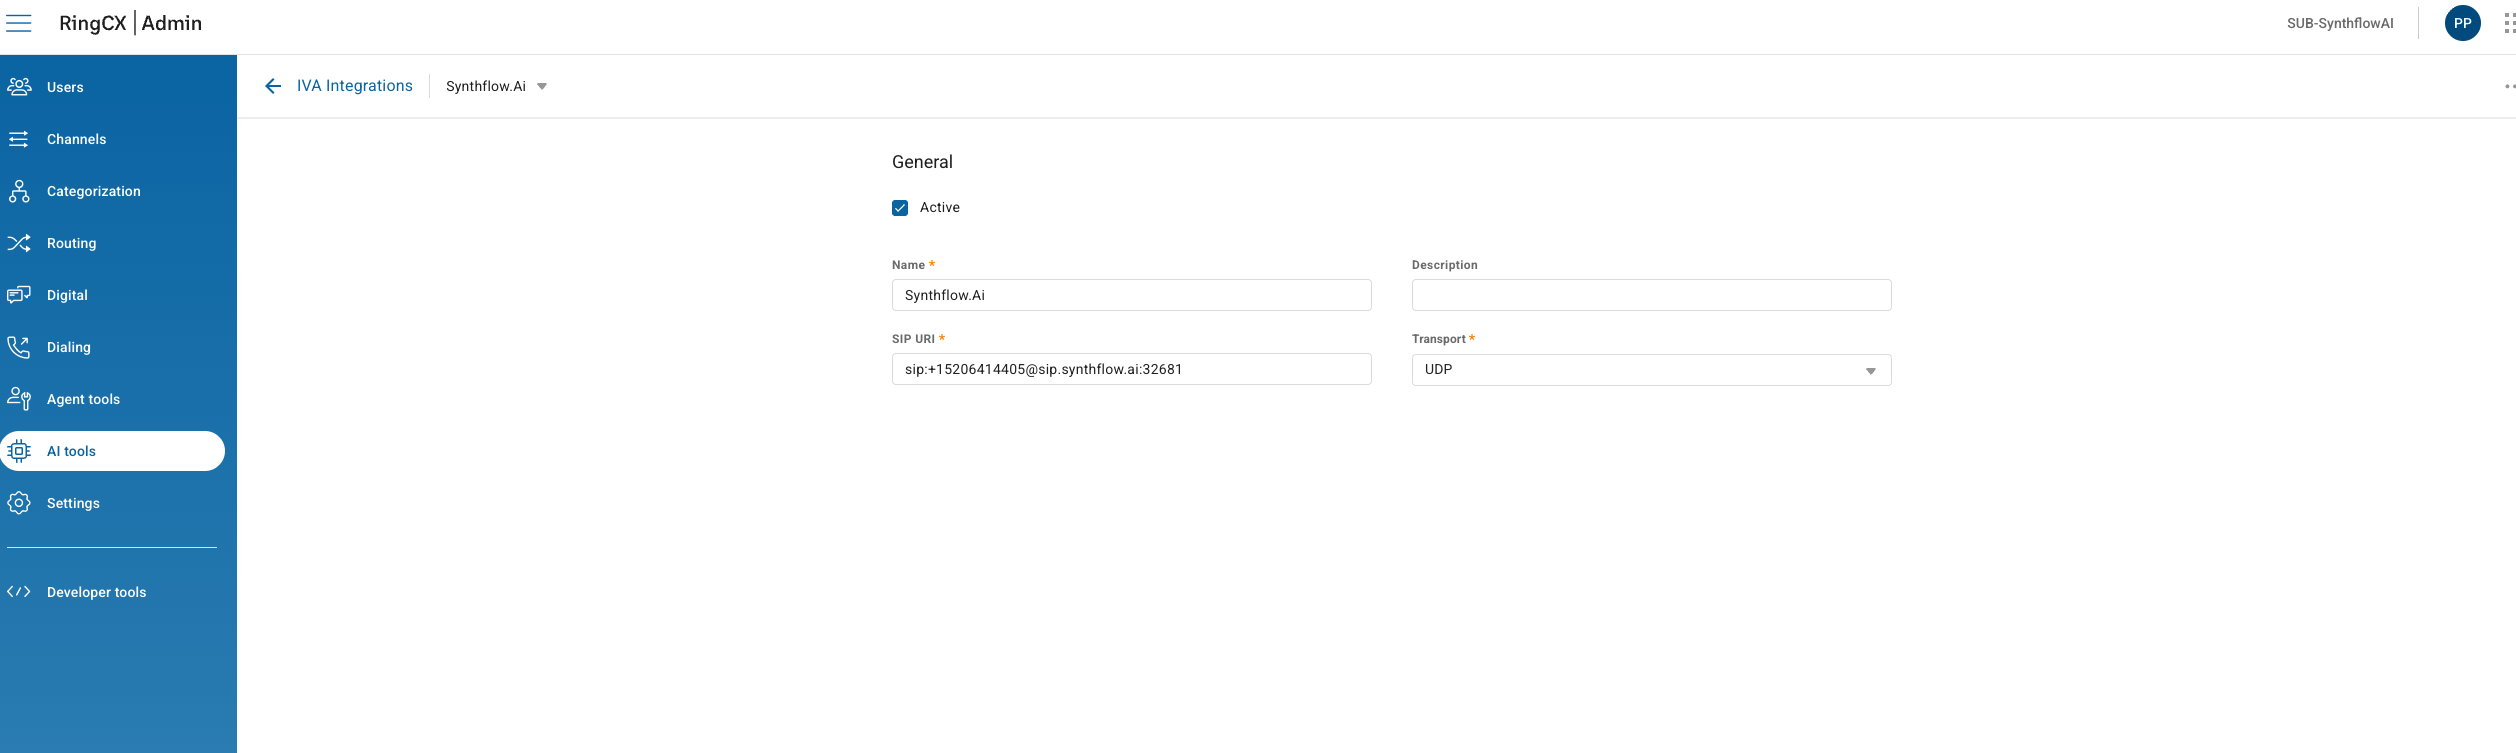
- Click AI Tools in the left navigation bar, then click IVA Integrations.
- Click New Integration and fill in the fields:
Replace <workflow_number> with the channel number you imported into Synthflow (in E.164 format, e.g. +15206414405).
- Select the Active checkbox to make the integration available in your workflows.
- Click Save.
The SIP URI must include the phone number in the user part. If you omit it (e.g. sip:sip.synthflow.ai:32681 with no number), RingCX sends an IP-only Request-URI and Synthflow rejects the call because it cannot determine which agent should handle it.
Build the workflow
Add the IVA to a workflow
- Sign in to RingCX and click the Admin tile.
- Click Categorization in the left navigation bar, then click Workflows.
- Expand the workflow group that contains your target workflow, then click the workflow.
- Click Workflow Studio in the left navigation panel.
- Drag and drop a JavaScript node from the left panel and place it before the IVA node (see Pass caller context with the JavaScript node below).
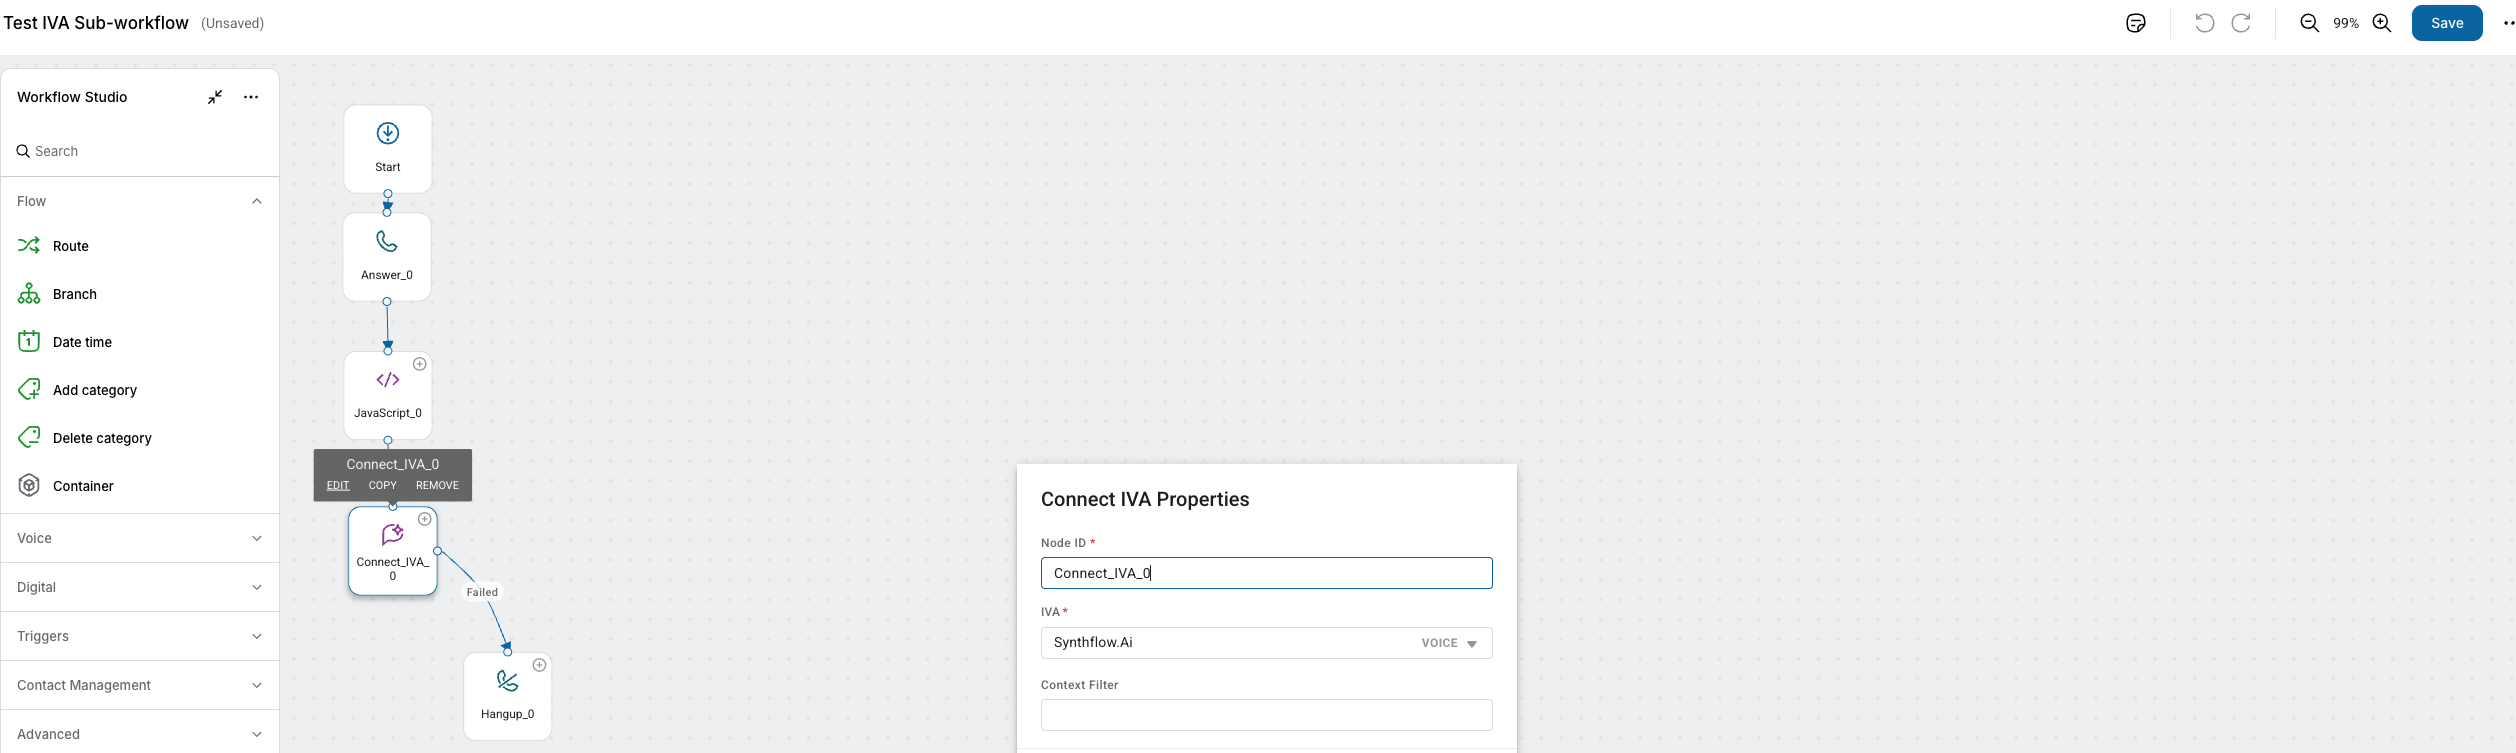
- Drag and drop the IVA node from the left panel onto the canvas after the JavaScript node.
- Hover over the IVA node and click Edit.
- Select the Synthflow integration you created.
- Optionally provide a Context Filter to control what session data is shared with Synthflow (e.g.
visibleData). - Click OK.
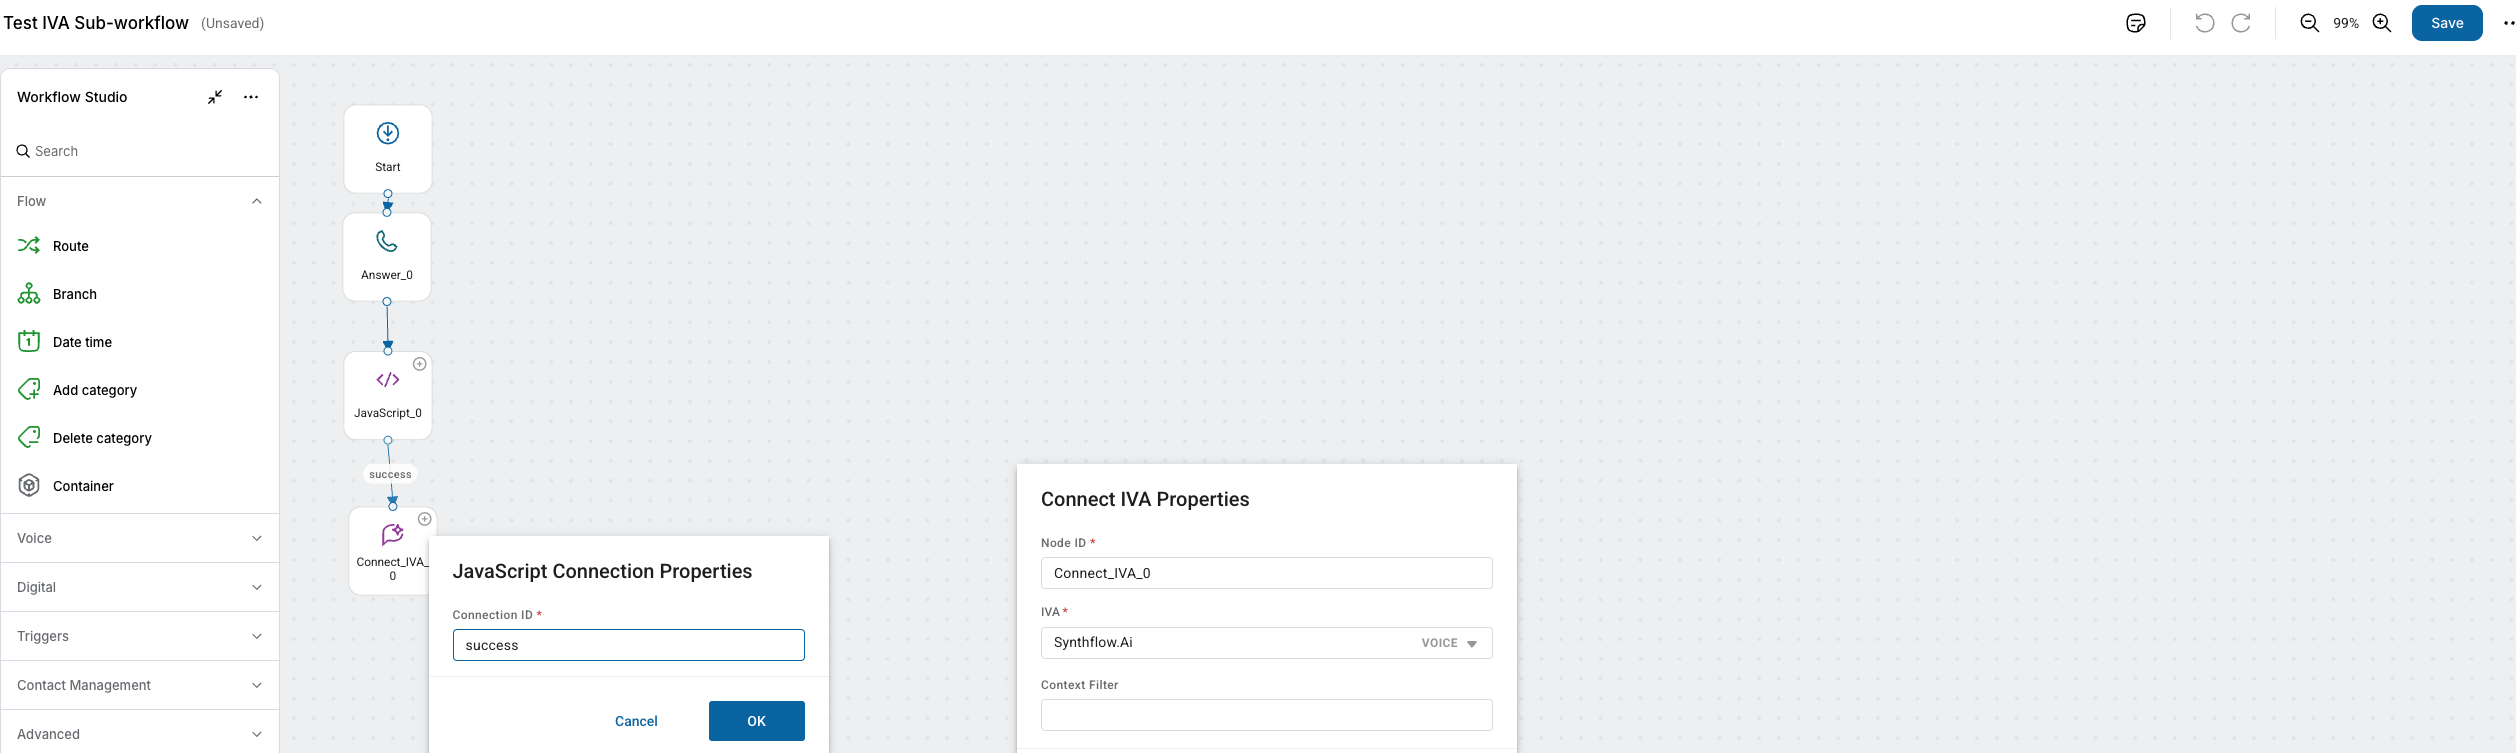
- Connect the JavaScript node to the IVA node. When prompted for a Connection ID, enter
success.
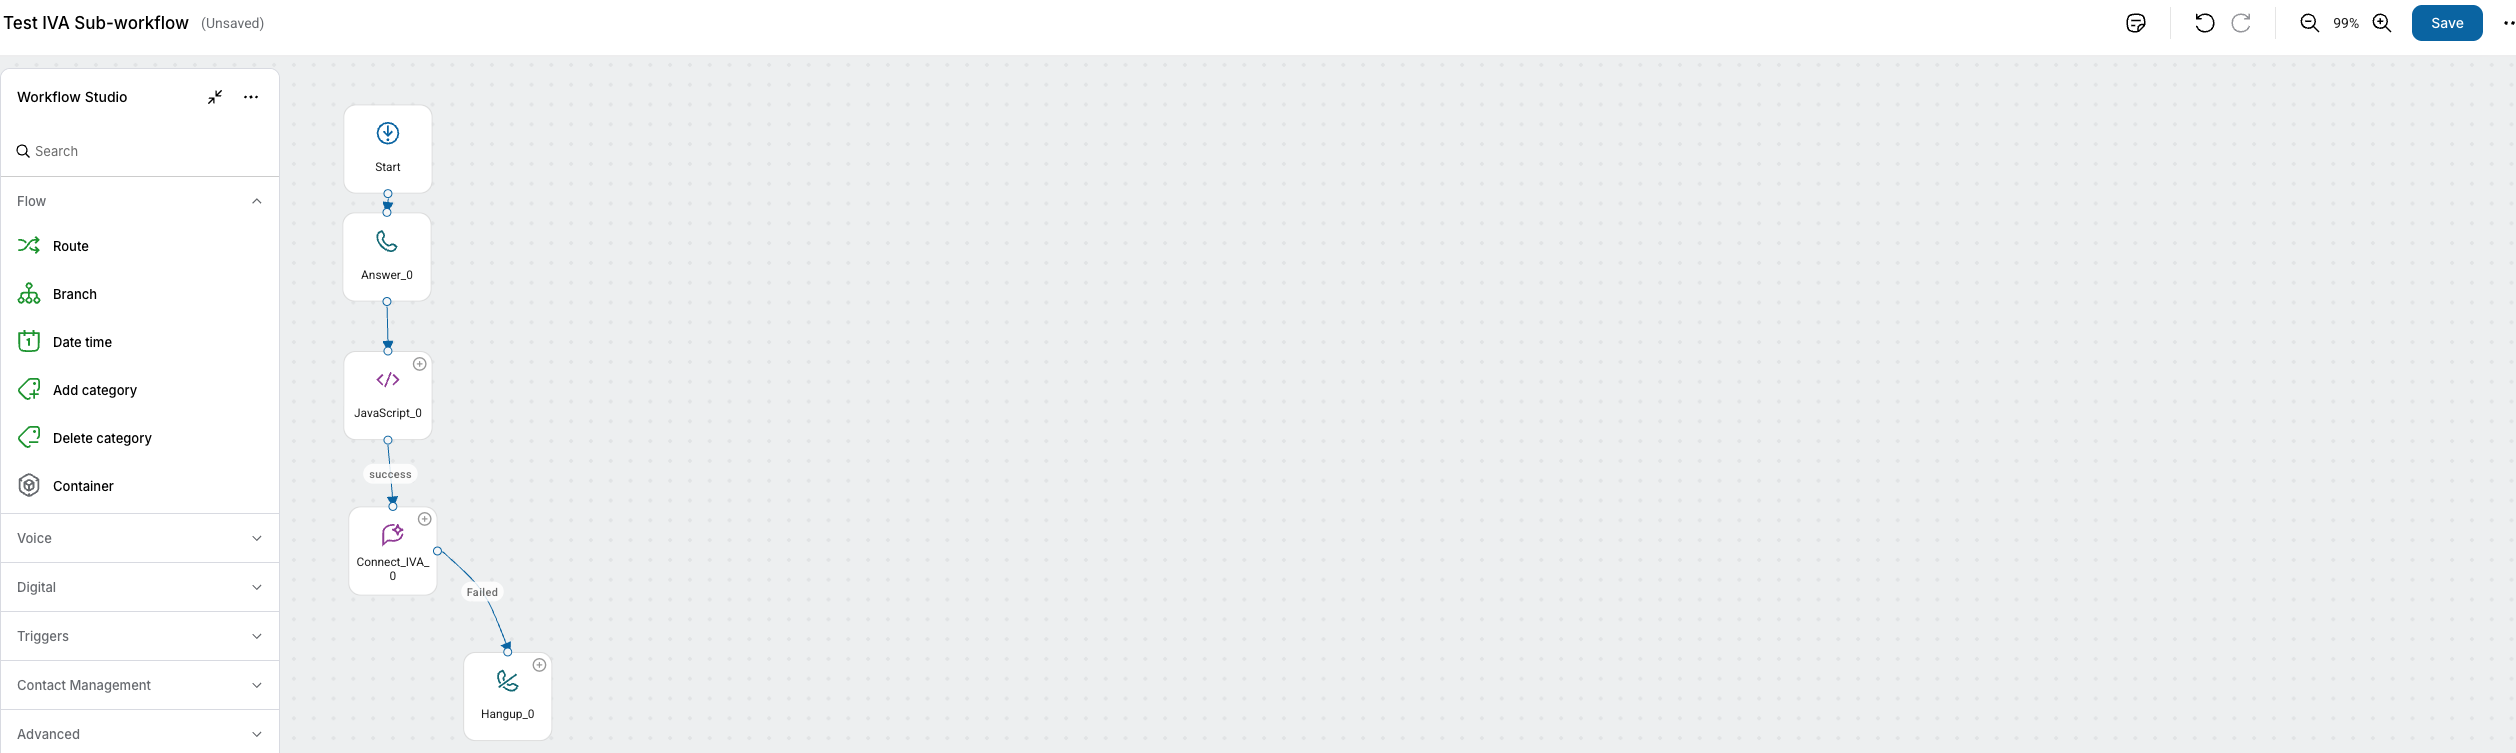
Once the IVA session completes, the call returns to the workflow and follows one of the configured connections:
- Success: The IVA session completed successfully and returned a result. The customer is still connected and the workflow continues.
- Failed: The IVA session did not complete successfully. The customer is still connected and the workflow continues on the error handling path.
- Disconnected: The customer disconnected before or during the IVA session. The workflow does not continue.
Pass caller context with the JavaScript node
A JavaScript node placed before the IVA node is required to pass the caller’s ANI (phone number), DNIS, and other metadata to Synthflow. Without it, the X-Bot-Context SIP header arrives empty and your agent receives no caller information.
- Drag and drop the JavaScript node from the left panel and place it before the IVA node.
- Hover over the JavaScript node and click Edit.
- Add the following script to build
sessionDatawith the caller’s ANI, DNIS, and call ID:
You can add other keys to visibleData besides ani, dnis, and callID. Synthflow exposes each one as a flattened variable, for example {X-Bot-Context.accountId}.
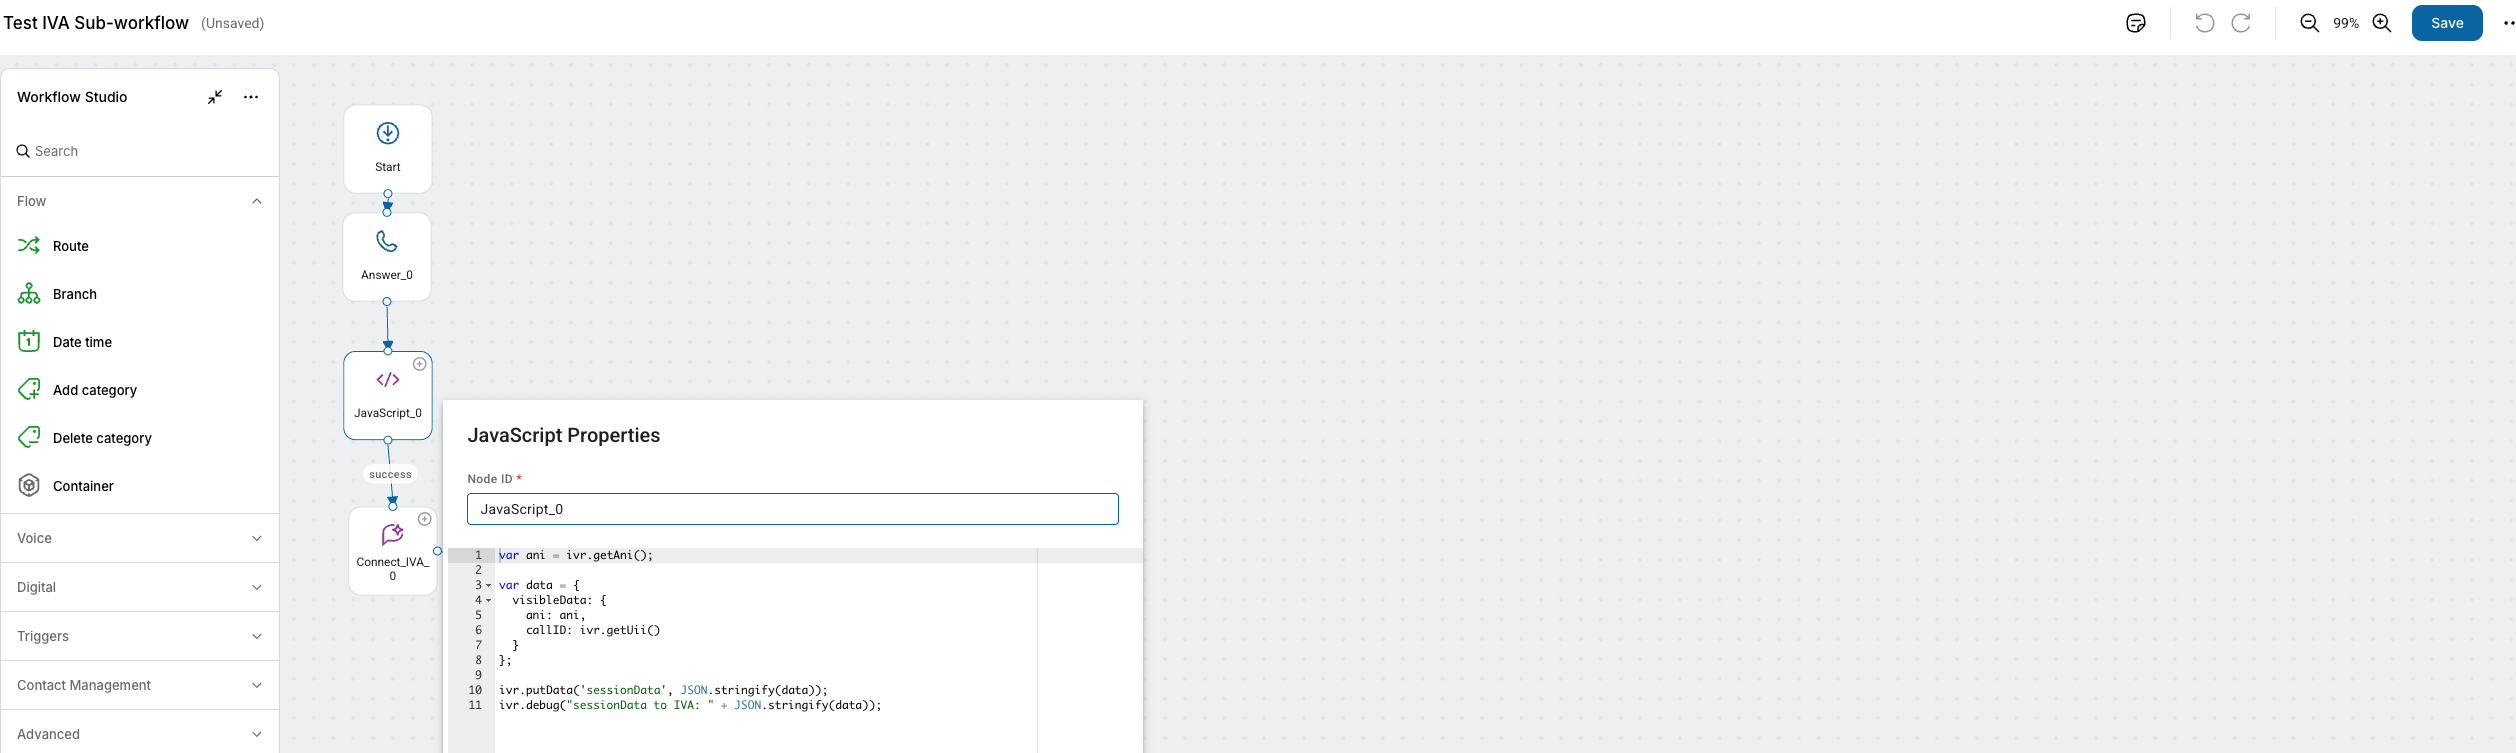
Do not declare sessionData with var. Using var sessionData creates a local variable that shadows the workflow-level global, which prevents the data from reaching the IVA node.
Filter context sent to the IVA
You may want to send only part of the workflow sessionData to Synthflow. Configure a Context Filter in the IVA node properties:
- Hover over the IVA node and click Edit.
- Enter a filter name in the Context Filter field (e.g.
visibleData). The workflow searchessessionDatafor a property matching that name and sends only that nested object to the IVA.
The Context Filter is optional. If left empty, the full sessionData is sent to the IVA. If the filter name does not match any property in sessionData, the full sessionData is sent as a fallback.
Use JSON context fields in Synthflow
RingCX sends the filtered sessionData to Synthflow as a JSON-encoded string in the X-Bot-Context SIP header. Synthflow flattens that JSON into prompt variables using dot notation, so you can reference nested fields directly in prompts, greeting messages, custom actions, and call transfers.
With the JavaScript example above and a Context Filter of visibleData, the flattened variables are:
Example prompt:
Example before-the-call action body:
If you leave the Context Filter empty, Synthflow receives the full sessionData object and the nested keys include the visibleData prefix, for example {X-Bot-Context.visibleData.ani} and {X-Bot-Context.visibleData.dnis}.
Custom fields follow the same {X-Bot-Context.field} pattern. Array values use 0-based bracket notation, for example {X-Bot-Context.items[0].id}.
Read IVA response data
After the IVA session completes and the call returns to the workflow, any metadata returned by Synthflow is available in the sessionData property. Use a JavaScript node after the IVA node to access this data.
Add the RingCX Handoff action
The RingCX Handoff action ends the Synthflow IVA session and returns the call to the RingCX workflow. When the action fires, Synthflow sends a payload back to RingCX containing any variables you define, then the RingCX workflow continues from the IVA node’s Success connection.
- In the Synthflow dashboard, open the agent assigned to your RingCX number.
- Go to the Actions tab and click Add Action.
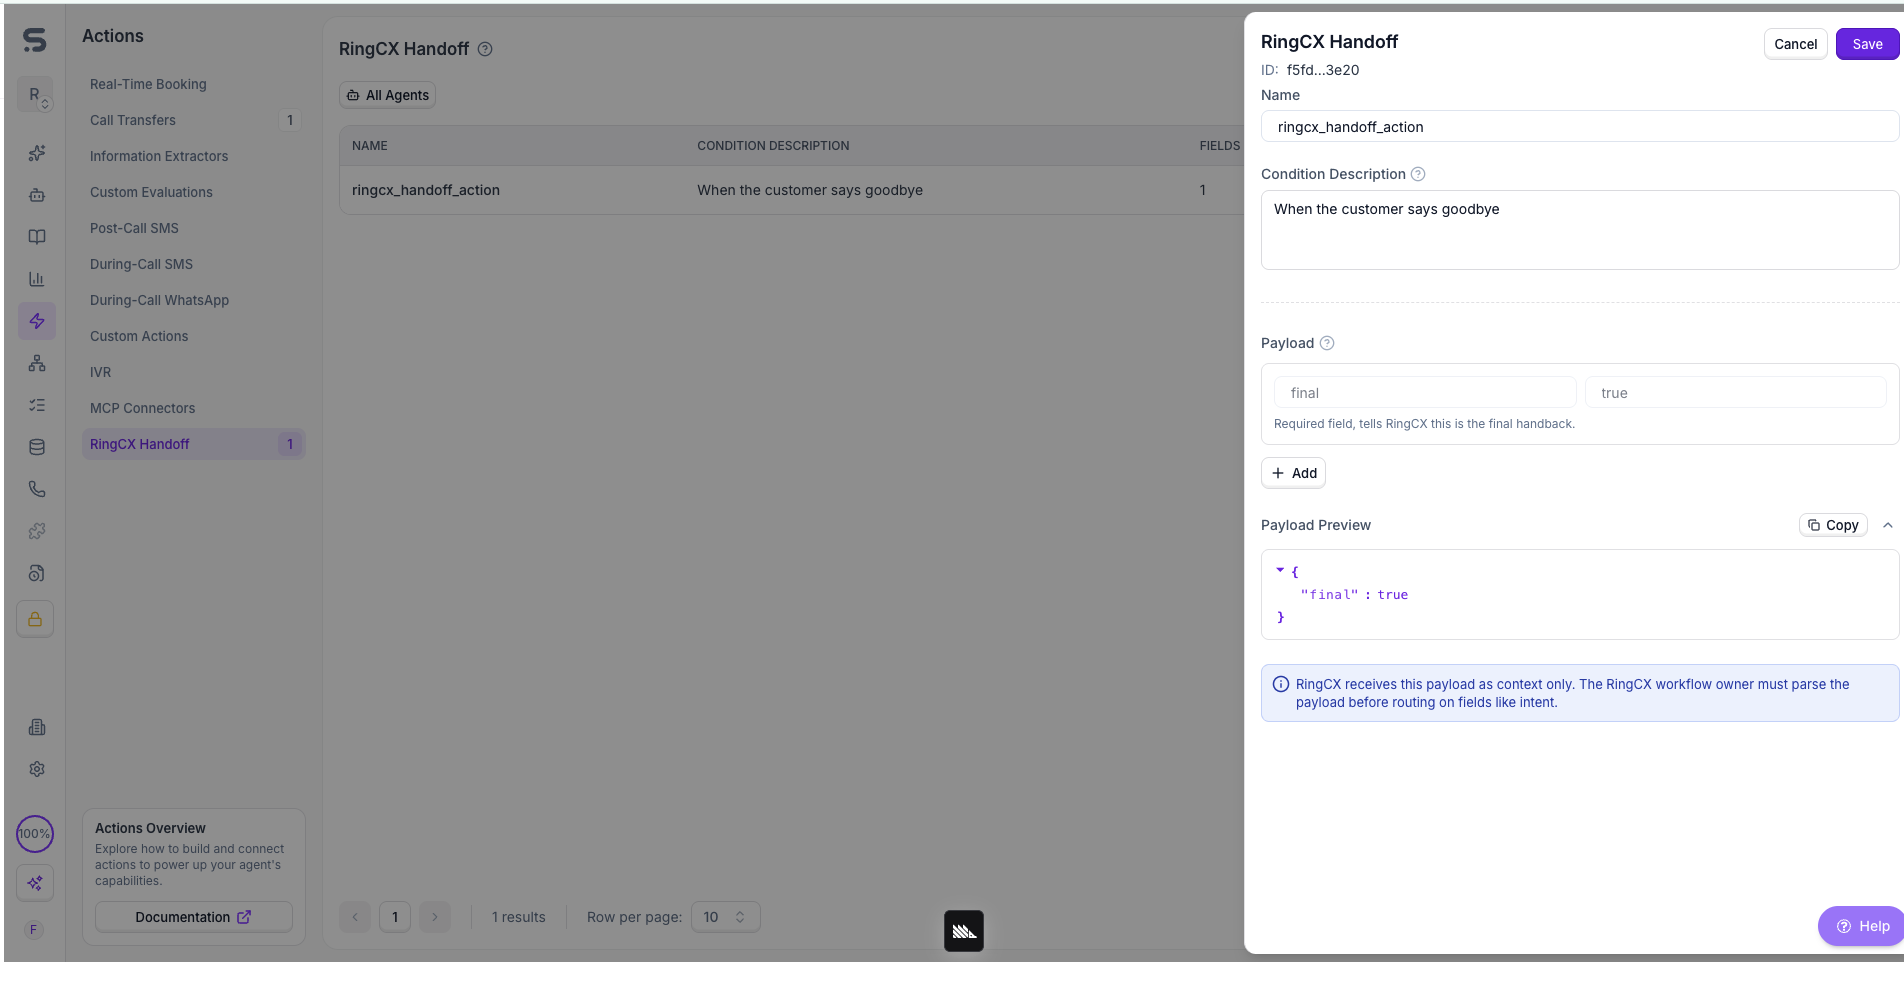
- Select RingCX Handoff.
- Set the Condition Description to tell the agent when to trigger the handoff (e.g. “When the customer says goodbye”).
- Define payload fields using the Payload section. Each field is a key-value pair that gets sent back to RingCX as part of the IVA response data. For example, add a
finalfield set totrueto signal that the handoff is complete.
You can add multiple payload fields to pass collected information back to the RingCX workflow. For example, if your Synthflow agent collects the caller’s intent, account number, or appointment preference during the conversation, add those as payload fields so the RingCX workflow can route or act on them.
RingCX receives the payload as context only. The RingCX workflow owner must parse the payload in a downstream JavaScript node before routing on fields like intent.
Usage
Inbound call handling
Once configured, calls that reach the IVA node in your workflow are routed to your Synthflow AI agent. The agent answers, follows its configured prompt, and can perform any available actions (booking, data collection, handoff).
Returning calls to RingCX
Use the RingCX Handoff action to end the IVA session and return the call to the RingCX workflow. Define payload variables on the action to pass data collected by Synthflow (such as caller intent, account details, or next steps) back to RingCX, where the workflow can parse and route on them.
Call transfers
Direct call transfers from Synthflow are not supported on RingCX trunks. The RingCX SIP trunk does not allow Synthflow to initiate transfers to external numbers or SIP endpoints during a call.
To transfer a caller to a live agent or another destination, use the RingCX Handoff action to return the call to the RingCX workflow, then route it from there using RingCX’s built-in queue, skill, or transfer nodes. This approach gives you full control over routing logic within RingCX Workflow Studio.
Call recordings and transcripts
Call recordings and transcripts are available in the Synthflow dashboard under the agent’s call history, the same as any other Synthflow call.
FAQ
What format should the SIP URI use?
The SIP URI format is sip:<workflow_number>@sip.synthflow.ai:32681. Replace <workflow_number> with your RingCX workflow channel number in E.164 format (e.g. +15206414405). The number must also be imported with the RingCX provider in the Synthflow dashboard.
Which transport protocol should I select?
Select UDP in the Transport field when creating the IVA integration.
What SIP Domain do I use when importing the number into Synthflow?
Select the RingCX provider. Synthflow automatically sets the SIP domain to sip.ringcentral.com.
Why is the JavaScript node required?
The JavaScript node builds the sessionData object that RingCX sends to Synthflow in the X-Bot-Context SIP header. Without it, your agent receives no caller context (ANI, DNIS, call ID, or any custom metadata).
How do I use ANI or DNIS in a Synthflow prompt or action?
Pass the values in sessionData from the JavaScript node (with a Context Filter of visibleData if you nest them under visibleData). Synthflow flattens the X-Bot-Context JSON header into variables such as {X-Bot-Context.ani} and {X-Bot-Context.dnis}, which you can use in prompts, greeting messages, and custom action URLs or bodies.
What happens if the IVA session fails?
The call follows the Failed connection path in your workflow. The customer remains connected, so you can route them to a queue, another IVA, or a hangup node.
Can Synthflow transfer calls directly during a RingCX session?
No. The RingCX SIP trunk does not support direct call transfers from Synthflow. Use the RingCX Handoff action to return the call to the RingCX workflow, then handle routing with RingCX’s queue, skill, or transfer nodes.
How do I pass data collected by Synthflow back to RingCX?
Add payload fields to the RingCX Handoff action. Each field is a key-value pair sent back to RingCX when the IVA session ends. Use a JavaScript node after the IVA node in your RingCX workflow to parse the returned sessionData and route based on fields like intent or account number.